 ij-solutions blog
Welcome to our blog
Our blog has been moved again. Now in Confluence Cloud! Find older posts here.


Table of Contents:
- Introduction
- Team and Ideas
- Development
- Crafting AI Agent: From Ideation to Realisation
- Integrating with OpenAI: Navigating Technical and Ethical Waters
- AI Agent Features: A Fusion of AI and User Empowerment
- Diving Deeper: Development Chronicles of the Project Settings Module
- AI Agent Issue Action: The User's Gateway to Enhanced Productivity
- The Analyse Feature
- The Answer Suggestion Feature
- The Assignment Feature
- The Translation Feature
- Challenges and Solutions
- Wrapping Up the AI Journey: Codegeist Unleashed, Development, and Beyond
Introduction
As the adage goes,
the only constant in life is change
and nothing epitomises this more than our fourth consecutive journey into Atlassian's annual Codegeist hackathon. This year, the theme - "Codegeist Unleashed" - promises an extravaganza of innovation, creativity, and technological marvel. We extend our heartfelt gratitude to Atlassian and Devpost for hosting this illustrious competition once again, an occasion that has perennially been a crucible for creativity and innovation.
A Glimpse into the Past: Our Storytelling Saga of 2022
Last year, our journey through Codegeist wasn't just about coding, but also about weaving a narrative around our creation. The storytelling post from 2022 captured the essence of our experience, the challenges faced, the Eureka moments, and the culmination of our efforts into a tangible piece of technology. If you're curious about our adventures from the previous year and wish to immerse yourself in our tale from 2022, we invite you to take a dive into our story. Read our 2022 Codegeist storytelling post here. You might find parallels, contrasts, and most importantly, the spirit of innovation that's been the common thread across our Codegeist participations.
New year - New Codegeist - New challenges
This year's Codegeist isn’t just another chapter in the book of hackathons but a new volume altogether. Participants are tasked with the thrilling challenge of melding the computational wizardry of AI with the robust versatility of Atlassian’s Forge platform. The official statement echoed the excitement and curiosity that surged within the global developer community:
Can AI fuel the workplace? Find out by building AI apps on Atlassian’s Forge platform.
A question, not just as a theme but a challenge, urging us to rethink, reimagine, and reinvent.
Participating for the fourth time, we found ourselves on familiar grounds, yet amidst an ambiance charged with a new, electrifying energy. Every previous year, we arrived armed with ideas, cultivated and honed to precision. But this year, Codegeist unleashed an unprecedented twist, a harmonious amalgamation of AI and Forge that rendered our well-crafted plans obsolete. A disruptive approach, yet a welcomed anomaly that compelled us to discard our preconceived notions and embark on a journey of exploration and discovery. We ventured into uncharted territories, where the lines between artificial intelligence and human ingenuity blurred, ushering in a new era where these separate entities come together as one.
Our initial ideas, as innovative as they were, lay in our pockets. The requirement to intertwine AI into the robust architecture of Forge wasn’t a constraint but a liberation. It unshackled our creativity, prompting us to delve deeper, think broader, and envision a future where AI is not just an accessory but an integral component driving workplace efficiency, creativity, and innovation. Without that requirement, we wouldn’t have considered integrating AI in one of our Forge apps.
Join us as we unfold our journey through Codegeist Unleashed 2023, an odyssey where we transcended boundaries, challenged norms, and embarked upon an uncharted voyage to explore how AI can truly fuel the workplace, bringing to life an application that epitomises the fusion of artificial and human intelligence. The intersection of these two worlds is where our story begins. Welcome to our narrative of innovation, challenges, and success at Codegeist Unleashed 2023.
Team and Ideas
Our Team and the Journey of Overcoming Challenges


Our team, albeit small in numbers, is rich in experience and zeal. Comprising just two members, we both are seasoned developers adept in crafting applications on Atlassian’s Forge platform. Our journey through this year's Codegeist presented us with an exciting yet intimidating challenge, pushing us into the unfamiliar terrains of AI integration and external API incorporations.
Juggling our primary jobs while navigating through the intense and demanding environment of a hackathon, our commitment to innovation and excellence was put to the test. We embarked on this journey fuelled by passion, operating within the confines of our limited free time. The balance between our professional commitments and the allure of Codegeist was a delicate one, demanding not just our skills but also unwavering dedication.
The timeframe allotted for this year's Codegeist added another layer of complexity to our endeavour. Spanning less than two months, from September 5 to October 24, every day, every hour was crucial. The ticking clock was a constant reminder of the impending deadline, bringing with it a mix of anticipation and anxiety.
Our initial hesitance was rooted in the dual challenge of a tight deadline and the novelty of the project's requirements. We were venturing beyond our comfort zone, integrating AI and external APIs – a domain where our expertise was yet to be tested. The apprehension was real; the uncertainty of whether we could develop something substantial and worthy of submission within the allocated time loomed large.
The challenge was not just temporal but also conceptual. The requirement to integrate AI meant that our pre-conceived ideas, though innovative, were not applicable. A complete reimagining of concepts was necessary, pushing us to not only think differently but also act swiftly and efficiently to transform these fresh ideas into a tangible and functional application.
Despite these challenges, our expertise in Forge and our unwavering commitment to innovation became our anchors. Each hurdle, each challenge was an opportunity for growth, a stepping stone towards not just a product but a testament to our resilience, skill, and the unyielding spirit of innovation.
The Brainstorming Process and the Genesis of AI Agent
In the intricate dance of ideas and implementation, our strategy was shaped by the constraints of time and the expansive realm of possibilities AI integration opened for us. Our first realisation was the impracticality of developing an AI model from scratch, given the limited time frame. The logical recourse was leveraging an existing AI framework, and OpenAI, with its widespread use and comprehensive API documentation, emerged as the natural choice.
AI as a Catalyst for Ideas
We harnessed the power of AI, not just as a feature in our prospective app but also as a tool in our brainstorming process. Utilising AI’s capabilities, we explored various application concepts and features, feeding the AI just with keywords and getting thought out, detailed ideas, which step by step led to the perfect one.
Ideas Considered
Content Summarisation in Confluence: Use AI to summarise content, pages or entire spaces in Confluence. Quickly dismissed as it paralleled the capabilities of Atlassian Intelligence and would have presented challenges in the size of the payload for the AI API.
AI-Powered Issue Generation in Jira: This idea was set aside due to the existence of similar applications on the Marketplace, negating the novelty we aimed for.
The Birth of AI Agent
The breakthrough came when we steered our focus towards Jira Service Management. Both of us, armed with firsthand experience and insights into the practical challenges and inefficiencies agents occasionally face, recognised a golden opportunity. The objective was clear - to devise an app that augments the efficiency and quality of service in handling support requests.
While conceptualising AI Agent, we acknowledge that a few features we envisioned are already being offered by Atlassian Intelligence or might be found in other existing applications on the market. However, it’s crucial to underscore the unique value proposition of AI Agent. Our application is tailored specifically for Service Management agents, amalgamating a set of functionalities and AI-driven insights that, in unison, deliver a novel, enriched user experience. Each feature is intricately woven to cater to the nuanced challenges and demands of service management, ensuring AI Agent stands distinct in its capability to enhance both efficiency and service quality significantly.
Naming Our Innovation
In the quest for a fitting name for our application, Smart A(I)gent was a strong contender, encapsulating the essence of AI’s role in enhancing agents’ capabilities. However, we settled for AI Agent, valuing its straightforwardness and readability, ensuring immediate comprehension of the app’s core functionality.
The synthesis of our collective experiences, insights, and AI’s transformative capabilities led to the conception of AI Agent. An embodiment of innovation aimed at not just enhancing operational efficiency but also elevating the quality of service in Jira Service Management.
Development
Crafting AI Agent: From Ideation to Realisation
Initial Tests: Gauging Possibilities
Embarking on the development journey of AI Agent, our initial steps were exploratory, aimed at understanding the realm of possibilities. Our preliminary tests revolved around establishing a connection with an external API from a Forge app. For these tests, we tapped into the capabilities of the Forge Fetch API. Our target? The Marketplace data API. With authentication streamlined through an API key, our test results were encouraging – we successfully fetched Marketplace data and integrated it seamlessly within our Forge app.Diving into OpenAI:
Transitioning from our initial success, we set our sights on the OpenAI API. A foray into the documentation of OpenAI painted a promising picture. Detailed tutorials, in-depth explanations, and a meticulously documented API greeted us, revealing the expansive potential of AI integration.
Spotting a node.js library tailored for OpenAI was a moment of exhilaration. Here was a tool that could ostensibly simplify our development process, integrating seamlessly with OpenAI.Overcoming Development Hurdles:
However, software development is rarely devoid of challenges. As we integrated the node.js package, we confronted an unexpected roadblock. Our preferred React version was at odds with the node.js library. The incompatibility threw a spanner in the works, making the desired integration elusive.
With the commitment to delivering a top-notch application, turning to another version of React was off the table. The risk of additional issues and incompatibilities loomed large, and our priority was ensuring a seamless user experience. Furthermore, time was limited and we couldn’t risk running into other issues that take time to fix.Finding Alternative Paths:
The solution? We pivoted to leveraging the Fetch API for our interactions with the OpenAI API. While this shift required recalibration, our adaptability and technical acumen ensured that the development journey continued unhindered.
In the ever-evolving world of software development, our journey with AI Agent reinforced the essence of flexibility, innovation, and problem-solving. It wasn't just about crafting an app but also about navigating the intricate maze of technological challenges, emerging wiser and more resilient with every twist and turn.
Integrating with OpenAI: Navigating Technical and Ethical Waters
The Prerequisite: OpenAI Plus Account
Our exploration into the integration of OpenAI within AI Agent brought us face-to-face with the inherent requirement of possessing an OpenAI Plus account. Each API request, a paid interaction, became a pivotal aspect to consider in the app’s architecture and future usability.
The Dilemma: Navigating API Access
The question of how to facilitate API access in AI Agent was critical. We juggled two primary considerations: ensuring the functionality of API calls and aligning with ethical, regulatory, and privacy standards.
Option one was to embed our own OpenAI API key within the app, rendering every user interaction a request via our account. However, this approach had significant drawbacks:
The financial implication meant the app, once marketed, would bear a higher price tag to offset the cost of API requests.
We would have no control over the nature of data transmitted via our account to the API, raising concerns about compliance and privacy.
The Resolution: Empowering User Autonomy
We pivoted to the alternative - empowering users with the ability to utilise their own OpenAI API keys. This decision was crystallised into the creation of a settings page in the Jira system administration. Administrators could seamlessly input their OpenAI API keys, linking API requests directly to their accounts. This approach not only mitigated the aforementioned challenges but also instituted a prerequisite of possessing an OpenAI Plus account to harness the full potential of AI Agent.
Implementation of the Jira admin settings page
The inaugural module of AI Agent was the Jira administration page, characterised by simplicity and functionality. Administrators are greeted by a form, where the OpenAI API key can be inputted, utilising the AtlasKit text field component as password input for enhanced security.
Leveraging the Forge Storage API, we ensured the secure storage of these sensitive API keys using the function
storage.setSecret()
to ensure the highest standards of data security and privacy in the Forge storage.
To increase confidence and ensure functionality, we incorporated a test connection feature. A ‘Test Connection’ button initiates an API call to retrieve available AI models in OpenAI. A successful return signifies an operational API key, offering users immediate validation of their inputted credentials. See the following screenshot of the settings page for Jira admins.

For future enhancements of the app, we could think of additional settings that could be applied by Jira administrators on this page, e.g. permission settings, restrict app access to certain projects or users, etc.
This meticulous approach of connecting OpenAI with AI Agent shows our commitment to balancing innovation with ethical standards, data privacy, and user autonomy, laying a robust foundation for the app’s subsequent development phases and for potential market access in the future.
AI Agent Features: A Fusion of AI and User Empowerment
After providing insights about the development of the interface and finding a way to link our app with the OpenAI API, we now want to focus on the core features of the app that help Jira Service Management agents in their daily work.
The AI Agent app, designed to enhance the efficacy and efficiency of Jira Service Management agents, brings together a myriad of features that transform the way support requests and tickets are managed. As we tread the development path, the evolution of these features was a mix of pre-planned strategies and insights garnered during the development process. Here's an in-depth look at the core features that AI Agent provides.
1. Project Settings:
Issue Categories: Jira project administrators can define distinct categories for issues and assign responsible persons for each, ensuring a targeted approach to issue assignment, categorisation and resolution.
AI Assignment Settings: Opt between issue assignments based on pre-defined categories or current workload assessment of each agent.
Automatic vs Manual Assignments: Choose if issues should be auto-assigned on issue creation or if agents should be able to manually assign them via the issue action menu based on a suggestion provided by AI.
Label Integration: Decide if AI Agent should automatically append a category label to issues upon assignment.
2. Issue-Level AI Integration:
The issue action module unveils an interactive dialog for service desk agents, incorporating AI for analysis, communication, assignment suggestion, and translation:
AI Analysis & Chat: Service desk agents can employ AI to analyse requests, drawing insights from issue summary and description. A chat interface allows agents to engage with the AI for deeper insights, with the option to add the conversation as an internal comment.
AI-Powered Response Suggestion: Agents can retrieve an AI-crafted response suggestion, customisable before posting as public comment. The flexibility in language and tone selection ensures tailored communication.
AI Issue Assignment: In scenarios where auto-assignment is disabled, agents can use AI to receive an assignment suggestion based on the preset criteria of category or agent workload.
AI Translation: Enhance global communication by translating request summary and description into English, German, Italian, French, or Spanish, courtesy of AI.
Similar Issues Query: AI provides keywords derived from request summary and description, and offers a link to a JQL search to identify similar existing issues, facilitating efficient issue handling.
The integration of these features wasn’t linear but an evolving process, each development phase uncovering new potentials and insights.
Diving Deeper: Development Chronicles of the Project Settings Module
When building the project settings module of AI Agent, our development approach blended familiarity with past experiences, while also introducing new strategies to tackle unique challenges. Here's an in-depth walk-through of how we crafted this integral module.
Leveraging Custom UI:
Having previously developed apps with custom UI (as highlighted in last year's blog post) and being well-acquainted with AtlasKit components, we had a strategic advantage. This familiarity allowed us to repurpose parts of existing code, streamlining development and saving valuable time.
Navigating New Territory:
While we ventured into using the Forge module for a project settings page for the first time, our prior experience with the project page proved advantageous, as the two bore strong similarities. This served as a helpful blueprint, easing our transition. Also, starting with a blank page on an app page and filling it with contents step by step, wasn’t new to us.
Building with AtlasKit:
The project settings form predominantly hinged on default AtlasKit components. At its helm is a primary selector to toggle between category-based and workload-based assignment, altering the subsequent form interface accordingly.
Category-Based Assignment Mechanics:
Upon selecting category-based assignment:
A dynamic table displays existing categories.
A ‘Create’ button introduces the capability to add new categories. Activating this button unveils a modal dialog. While specifying a category name is compulsory, designating a responsible user remains optional. However, selecting a responsible person for each category is crucial for taking full advantage of the auto-assignment in the app.
The user selection mechanism was repurposed from another app. Here, as administrators type in a username, an internal product API call searches and fetches and returns user options, making the user-assignment process smooth.
Workload-Based Assignment Mechanics:
Choosing workload-based assignment presents:
A user selection field to define project agents. To ensure optimal AI responsiveness and manage API payload sizes, we took the deliberate step of requiring a separate user definition for AI Agent, instead of defaulting to all users possessing agent permissions in the service management project.
Optimal Data Storage:
Given the project-specific nature of these settings, it was imperative that the data was intrinsically linked to individual projects. Leveraging the Forge Properties API became a natural choice, storing data at the project level. This method ensured that the settings remained coherent and tied to their respective projects, rather than being universally stored within the app.
In essence, the creation of the project settings module was a meticulous process, weaving together past learnings with current challenges. Our iterative approach, combined with strategic decisions at pivotal junctures, ensured that the module was both robust and user-friendly, perfectly encapsulating the essence of AI Agent's core functionalities.
Screenshots of project settings:


AI Agent Issue Action: The User's Gateway to Enhanced Productivity
When navigating Jira, the tools that are most frequently accessed and valued by users often reside within the immediate user interface. That's precisely where we located the AI Agent. Through a simple, intuitive, yet powerful issue action, users can access a bunch of AI-enhanced features.
Accessing AI Agent
For any agent working on a Jira issue, the AI Agent tool is just a click away. By selecting the three-dot menu in the upper right corner of an issue, agents can activate the AI Agent issue action. Upon selection, a modal dialog is revealed, serving as the main interface for interacting with the suite of AI-driven features.
Organised Feature Access
To ensure a seamless user experience, it was crucial to organise these features in a manner that was both intuitive and efficient. Drawing inspiration from our past endeavours, we opted for a tabbed interface within the modal dialog. This decision wasn’t just driven by our aim for an organised layout, but also by the practicality of reusing proven strategies from our previous apps.
Each tab corresponds to a distinct feature: Analyse, Answer Suggestion, Assignment, and Translation. The decision to compartmentalise features into individual tabs ensures that agents can quickly switch between functionalities, enhancing their productivity without overwhelming them with too many options at once.
Building on the Familiar
The familiarity of developing modal dialogs and tabbed interfaces from our past projects provided a significant advantage. By reusing portions of the code, we not only saved development time but also ensured that we were integrating components that had already been tested and refined.
We now would like to go into more details about the individual features.
The Analyse Feature
As we started constructing the ‘Analyse’ feature, we embarked on a journey where the initial blueprints were transformed, enriched, and enhanced to meet the practical and dynamic needs of the users.
Initial Concept
The primary inspiration stemmed from the need to assist agents in dissecting complex requests. We envisioned a feature where the AI would process the issue’s summary and description and provide insights into the problem and potential next steps. The agent could then, if deemed helpful, directly integrate this analysis as an internal comment on the request from the AI Agent dialog.
The First Iteration
Our initial build was aligned with this vision. Utilising the OpenAI API, the feature extracted the issue's summary and description, and returned a synthesised analysis. However, as we experimented and interacted with this initial build, a realisation dawned - while useful, it wasn’t exhaustive in its utility.
A Pivot Towards Enhancement
The first iteration’s limitation was its static nature. The agent could regenerate an analysis, but there was no provision to delve deeper, to ask follow-up questions or seek clarifications from the AI. This realisation prompted a pivot in our development approach.
Inspired by the following example within the OpenAI API documentation, where a dynamic conversation unfolded between the user and AI, we recognised the untapped potential of making the ‘Analyse’ feature interactive.

Introducing Chat Functionality
We augmented the feature with a chat functionality. Post the initial AI analysis, a text area field emerges, inviting agents to type in additional questions or comments. Each input is relayed to the OpenAI API, and responses are received, making the interaction dynamic and iterative.
This evolution from a one-off analysis to an interactive chat was not just a technical enhancement but a strategic adaptation to make the feature truly user-centric. The development process was characterised by iterative testing, feedback integration, and continuous refinement to ensure that the feature didn’t just exist but thrived in its utility.
Final Form
These screenshots show the final implementation of the analysis tab with a short chat conversation:


Together with each new chat message, we send the entire conversation to the API making it possible that the AI Agents answers can refer to that pervious conversation and you can ask follow-up questions.
The Answer Suggestion Feature
In the realm of service management, prompt and effective communication is paramount. Recognising this, our development journey for the ‘Answer Suggestion’ feature was directed towards enabling Jira Service Management agents to communicate with efficiency, clarity, and adaptability. The development tale of this feature is one of strategic enhancements and precision.
Initial Design
At the heart of the ‘Answer Suggestion’ feature lies the ability to draft public responses. Understanding the sensitivity and importance of these outward-facing communications, it was imperative that the AI-generated suggestions remain editable. Our vision was straightforward: AI provides an answer suggestion, which then populates a text area field. Agents can refine this suggestion before publishing it as a public comment to the issue.
Refinements & Additions
However, as we ventured deeper into the development phase, the scope for enriching this feature became evident. An interactive, user-centric design approach led us to integrate AtlasKit select lists on top of the tab. These additions enabled agents to tailor the AI response further.
Language Selection: Agents can choose the language of the response, accommodating global customers and ensuring the communication resonates.
Style Customisation: Another addition was the style selector, allowing agents to set the tone of the response – be it professional, polite, or informal. This flexibility ensures that the AI-generated response isn’t just accurate in content but also apt in its delivery. What’s more, the architecture is designed to easily accommodate additional styles in the future, ensuring scalability.
Integration with AI Agent Dialog
The AI Agent dialog is the primary interface where agents interact with these functionalities. To streamline the process, we ensured agents could directly post the refined AI-generated response as a public comment. However, given the specific nature of internal vs. public comments, we made a strategic decision to enable the commenting feature exclusively for service management projects. The same applies also for the internal comment inserted from the analyse tab.
To execute this, upon loading the dialog, the app fetches the project’s information. A built-in condition then determines the visibility of the ‘Add Comment’ buttons, ensuring they're only displayed within the context of a service management project.
Final Form
These screenshots show the final implementation of the answer suggestion tab:


The Assignment Feature
When venturing into the development of the ‘Assignment’ feature for AI Agent, we navigated through intricate pathways of strategic decision-making, technical precision, and innovative adaptability.
Initiating the Assignment Process
Upon the invocation of the AI Agent dialog, an initial step involves fetching the project settings via the Properties API. This data, encompassing stored categories or agents, the assignment mode (automated or manual), and preferences for category labelling, lays the foundation for the subsequent assignment process.
Navigating Automated and Manual Assignments
Automated assignments, once set, bypass the visibility of the ‘Assignment’ tab, streamlining the user interface for agents. In contrast, manual assignment ushers agents to a button that, upon activation, fetches AI-powered assignment suggestions.
Dynamics of Category-Based Assignment:
For category-oriented assignments, a bundle of issue summary, description, and project categories are dispatched to the OpenAI API. The meticulously crafted prompt is designed to elicit a singular category word, signifying the AI's suggestion. This suggestion is used to display the responsible user to the agent, so the agent can decide to directly assign the issue from the AI Agent dialog.The Workload-Based Assignment Mechanics
In the realm of workload-based assignments, the process unfolds with complexity and precision. JQL queries, executed in parallel for efficiency, fetch assigned open issues for each agent. This data, amalgamated with the issue's summary and description and the status category of open assignments, is then processed by the OpenAI API to recommend an agent for assignment. Our choice to include the status category was strategic, enabling the AI to prioritise agents with fewer open issues and a higher tally of in-progress tasks, signalling imminent resolution.
Mastering the Art of Prompt Design
This feature heralded our inaugural deep dive into intricate prompt designs for the AI. It was a journey of exploration, learning, and refinement, each iteration enhancing the AI’s response quality and format alignment with our frontend processing needs.
Automated Assignment via Forge Events API
In the automated assignment landscape, we made our first foray into the Forge Events API. An issue creation triggers a listener that employs a similar concept as manual assignment explained above but executes requests ‘asApp’ and not ‘asUser’, courtesy of the absence of direct user interaction during this process.
Final Form
This screenshot shows the final implementation of the assign tab:

Closing Thoughts
The development trajectory of the assignment feature is characterised by strategic enhancements and technical innovations. It exemplifies a balanced interplay of backend precision and frontend adaptability, ensuring that AI Agent doesn’t just assign tasks but does so with an acumen that mirrors the dynamic and diverse nature of Jira Service Management.
The Translation Feature
In the tapestry of AI Agent’s features, the ‘Translation’ feature, albeit compact, carves out its own distinctive space. It's a testament to the philosophy that utility isn't always proportionate to complexity. Nestled within its straightforward design lies a capacity for tangible impact, enhancing global communication and understanding in the Jira Service Management ecosystem.
Choosing the Linguistic Path
The first interaction for agents within this feature is an AtlasKit select list. Agents are presented with five language options - English, Italian, German, French, and Spanish, offering a span that caters to a significant global user base.
The Translation Mechanism
With the language selected, the journey to translation is a click away. Agents activate the process via a button, initiating the AI’s engagement with the issue's summary and description. The AI, armed with the selected language preference, returns a translated rendition of the text.
Refinement and Customisation
Aware of the nuances and idiosyncrasies of languages, we ensured that the AI’s translation, while advanced, remains a starting point. Agents are presented with the translated text in a text area field on the AI Agent dialog, inviting refinements and adjustments to ensure linguistic accuracy and cultural appropriateness.
Integration with the Issue
Once refined to satisfaction, agents have the convenience of adding the translation directly as an internal comment to the request, ensuring that the translation is not just generated but also seamlessly documented in the issue’s communication thread.
Challenges and Solutions
Every development journey is punctuated with challenges that demand innovative solutions. Our venture into the Codegeist 2023 competition was no exception. Integrating an AI API, especially in an environment as robust as Atlassian's Forge, presented its unique set of technical considerations, one of it being the invocation timeout.
The Challenge of Invocation Timeout
Forge's conventional 25-second invocation timeout is a strict limitation that ensures efficiency, but it can pose significant hurdles for apps like ours that lean heavily on external API integrations. During this years Codegeist, however, the timeout was extended to 55 seconds, hinting that we weren't the only developers grappling with this constraint. While the increased limit offered some breathing room, it was essential for our app to function effectively even within tighter boundaries.
Why We Never Hit the Timeout
Our app’s inherent design played a pivotal role in ensuring we didn't hit the invocation timeout. Given the nature of our application, operating predominantly at the issue level with AI integrations, the data payload was relatively limited. Our prompts, though meticulously crafted, were concise enough to ensure prompt responses from the AI. Throughout our rigorous testing phase, we consistently observed responses that comfortably nestled within the timeout window.
The Strength of Custom UI with Backend Integration
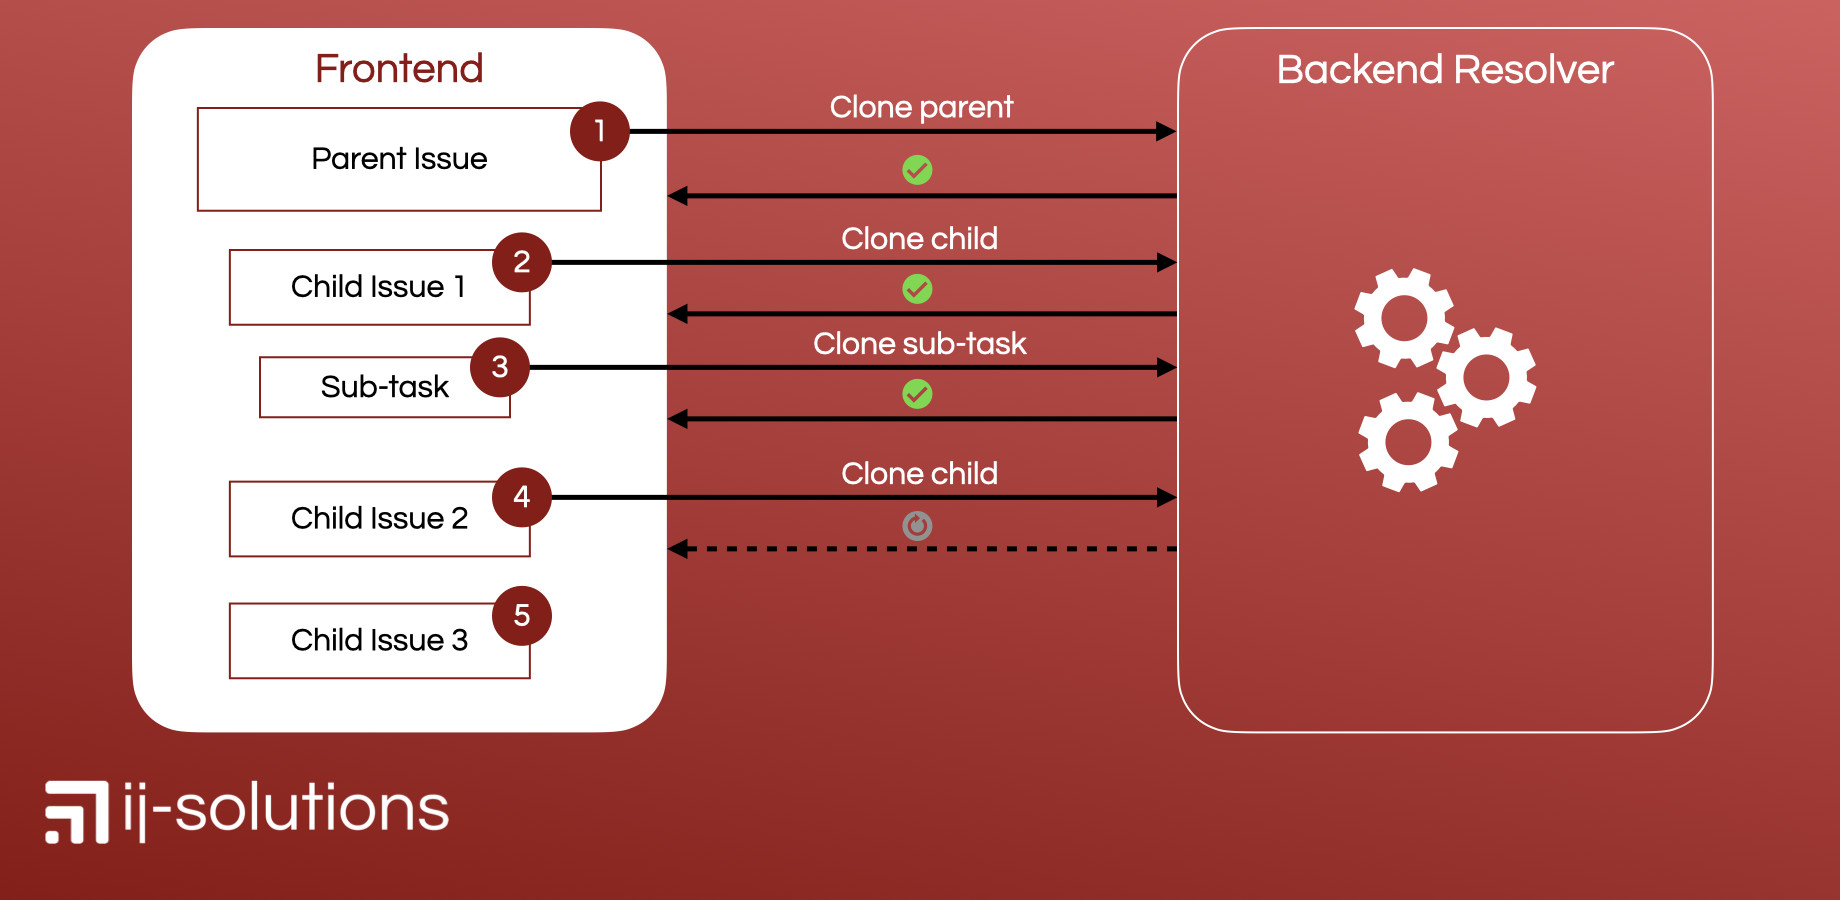
Choosing to use custom UI, complemented by backend functions, proved to be the right strategic decision. Unlike UI kit, which relies heavily on frontend operations, our approach allowed for a seamless data transition from the user interface to the backend. This architecture ensured that, upon user initiation, data could be restructured, modified, or even enhanced with supplementary information before making its final journey to the OpenAI API.
The following image shows this interaction between frontend and backend which is only possible with custom UI. In UI Kit every operation that is shown on the backend side would run in the frontend and count towards one timeout limit, whereas with this implementation every API call on the right side has its own invocation timeout limit of 25 or 55 seconds, respectively.

This backend preprocessing played a dual role. First, it ensured that the data sent to the OpenAI API was optimally structured, ensuring quicker AI responses. Second, it provided a buffer to manage and streamline data before external API calls, reducing the time spent waiting for a response and further ensuring we stayed clear of the timeout.
Conclusion
Our technical approach to the challenges posed by the Forge environment was rooted in foresight and adaptability. By making informed choices at the architecture level and leveraging the strengths of backend preprocessing, we ensured that our AI Agent app not only met but thrived within the constraints of Forge's invocation timeout. It's a testament to how strategic design can turn potential challenges into seamless user experiences.
The Challenge of Redundancy
In the dance of building a sophisticated, AI-integrated app, challenges arise not just in the lines of code but in the conceptual framework that houses them. One such challenge we encountered was ensuring efficiency in the use of AI analysis and answer suggestion. Every invocation to the AI is a dance of time and cost; hence, avoiding redundancy was paramount.
As the app serves a collaborative environment, multiple users might necessitate AI analyses or answer suggestions for the same issue. Given the cost associated with each AI request and the time it consumes, a system that indiscriminately allows repeated requests would neither be economically nor operationally efficient.
The Conceptional Shift
Our solution was rooted in foresight and efficiency - a mechanism to ‘cache’ AI-generated data. The concept was straightforward yet profoundly impactful. Why repeat a dance that’s already been gracefully executed?
Technical Execution
We turned to the robust capabilities of Forge’s Properties API to bring this concept to life. Every time an AI analysis or answer suggestion is successfully conducted, the results are stored directly on the issue. This isn’t just a technical operation but a strategic conservation of resources.
When a user (or another user) invokes the AI Agent dialog, an initial check is performed on this ‘cache’. If prior AI-generated data is found, it’s directly rendered on the dialog, eliminating the need for a redundant AI request. This not only conserves resources but significantly enhances the user experience, offering immediate insights without the wait.
The Impact
This system ensures that each AI invocation is as unique as the issue it caters to, avoiding unnecessary repetition. It’s an elegant dance of conceptional foresight and technical execution that ensures each step, each AI invocation, is purposeful and unique.
The Challenge of Data Inconsistencies in Storage
When handling storage operations in an app, especially within a multi-user environment, concurrency can pose significant challenges.
In a collaborative environment, simultaneous operations on storage values by different users can lead to data inconsistencies. Specifically, if one user is attempting to update a storage value while another is fetching it, there’s a potential risk of reverting the value to its previous state instead of saving the new one.
Learning from the Past
This wasn't our maiden voyage into such waters. We encountered this in one of our other apps, and with Atlassian support's aid, we charted a way out. The answer was an asynchronous approach.
The Asynchronous Solution
Instead of directly invoking storage calls when data needs an update, we integrate an asynchronous event API to manage operations.
Introduction of Queues: The key was to funnel storage tasks through a queue. For the AI Agent app, we established settings and cache queues, which represent different types of data we store.
Storage Jobs: When data needs saving, we don’t immediately write it to storage. Instead, we push a new job to the relevant queue, in our case, either the settings or cache queue. Each job in the queue is assigned a unique ID and has a status indicating its progress.
Storage ID Tracking: We meticulously track the ID of every 'storage-job' using the Storage API. This ID is crucial to manage and synchronise operations.
Status Checks: Before any storage operation (fetch or save), the app checks the job's status. If the status indicates ongoing progress, the operation waits (a timeout of 500ms is added) and rechecks the status. We built this loop to retry up to five times if the status remains ‘in progress’.
Visual Explanation
The attached block diagrams concisely illustrate this implementation. The diagrams showcase the interaction between frontend, backend, queue, and storage operations, emphasising the asynchronous nature of the system.
Fetching Data from Storage: The first diagram illustrates the steps and checks involved when fetching data. The main pathway ensures that no save-job is currently in progress, ensuring the data fetched is consistent and up-to-date.
Saving New Data to Storage: The second diagram provides insights into the storage process. Notably, it details how the queue system works and how the unique job ID and status come into play.


Conclusion
This asynchronous approach effectively mitigates risks associated with concurrent storage operations. By segregating and queuing operations, and by employing careful status checks, we ensure the integrity and reliability of data within the AI Agent app. It's a perfect blend of our past learnings and forward-thinking solutions, making data operations smooth and efficient for all users.
The Challenge of Data Security and Privacy
In the rapidly evolving digital landscape, data security and privacy stand paramount. When integrating external tools into familiar systems, like Jira in our case, apprehensions about data handling are valid. With the AI Agent app, we took proactive measures to ensure the utmost security of user data while also preserving the app's functionality.
Individual OpenAI Accounts for Data Transparency
The primary concern was the transmission of data from Jira to an external API, specifically an AI-based one like OpenAI. Our solution, as already explained above, was simple yet effective: each Jira instance uses its unique API key to communicate with OpenAI. By doing so, every organisation handles its data through its own OpenAI account. This approach circumvents any potential data transfer through our account, ensuring that data remains within the boundaries of the respective organisation's purview.
GDPR Compliant Data Handling
General Data Protection Regulation (GDPR) has set strict guidelines on how user data should be managed. We've meticulously crafted our system to align with these standards:
No Direct User Data Transmission: Throughout the app, we've consciously avoided sending any direct user data to the AI. Instead, we've opted to use accountIds, which are abstract representations, concealing the user's identity. This ensures GDPR compliance and adds an extra layer of data protection.
Category Assignment and Data Minimisation: For functionalities like category assignment, only the category names are transmitted to the AI. This way, we further minimise the amount of data being sent externally. The assignment of the responsible user is handled internally within the app, eliminating the need to share user-specific data with the AI.
Acknowledging the Limitations
While we've gone to great lengths to safeguard user data, it's essential to be transparent about the app's inherent design. The nature of the AI Agent app requires sending issue-specific data, specifically the summary and description, to the OpenAI API. We understand that some data transfer is inevitable for the app to function as intended.
Wrapping Up the AI Journey: Codegeist Unleashed, Development, and Beyond
Codegeist 2023 unveiled a new horizon of possibilities, embodying challenges and an unprecedented approach. The realm of coding contests saw a revolutionary twist that transcended conventional boundaries, encouraging creators to think innovatively.
At the heart of our journey was our team. A collective unit fuelled by passion, creativity, and a shared vision. From the outset, our brainstorming sessions resonated with the goal to augment the daily life of service management agents. Our process of idea generation, inspired by collective insights and the capabilities of AI, laid the foundation for what was to come.
The ensuing development phase was marked by explorative tests and iterative processes. Each feature of the AI Agent app was meticulously crafted, echoing our commitment to deliver unparalleled value to Jira users. However, like any creation process, we encountered our share of technical challenges. Yet, with every roadblock came an innovative solution, testifying to our team's resilience and adaptability.
Below is a list of the Forge modules and components we leveraged during our development process:
Forge Modules:
Forge APIs:
Notably, our project hinged on the external integration of the OpenAI API, which we accessed through Forge's Fetch API.
But the unique aspect of our journey was the integration of AI at virtually every juncture. This endeavour was not just our first foray into embedding AI within an app; it was a holistic experience where AI played a pivotal role. The AI's footprint was visible not just in the AI Agent app's core functionalities but also in various facets of our project:
Idea Conception: The initial brainstorming was augmented by AI's capability to generate and formulate ideas.
Content Creation: AI assisted in text generation for our project description, a mandatory part for our Codegeist submission.
Demo Data Generation: AI streamlined the creation of demo data in our Jira service management test instance.
Visual Demonstrations: Our demo video, a Codegeist requirement, was seamlessly crafted with AI's aid.
Coding Assistance: GitHub Copilot was our coding companion, accelerating our coding process and fulfilling simple programming tasks.
In essence, AI wasn't just a tool; it was an active participant in our journey. It allowed our compact team to accomplish monumental tasks within a constrained timeframe. Our journey with the AI Agent app is a testament to the synergy of human creativity and AI's capabilities.
We embarked on this journey to harness the potential of AI, and in the process, AI became an integral part of our story.
Thanks for reading, we appreciate any feedback. You can reach out to us by mail to info@ij-solutions.com
Stay tuned what’s next with ij-solutions and our apps on the Atlassian Marketplace!

🎉 Exciting News! 🏆 ij-solutions has been awarded the Silver Marketplace Partner status by Atlassian! 🥈
We are thrilled to share this fantastic achievement with our amazing community of customers and partners from around the world. This recognition is a testament to the hard work, dedication, and expertise of our small but mighty team at ij-solutions.
We would like to extend our heartfelt gratitude to all our customers for their trust and support. Without you, this accomplishment would not have been possible. Your feedback and enthusiasm continue to drive us to innovate and excel.
As a Silver Marketplace Partner, we are even more committed to delivering top-notch solutions that enhance your Atlassian experience. Stay tuned for exciting new features, updates, and integrations for our apps Epic Clone, Duplicate Epic, User Absence Planner and Project Milestones for Jira.
Our partnership with Atlassian and you, our valued customers, is the cornerstone of our success. Thank you! 😊
How a Jira admin became a developer, and a company developed their first Cloud apps using Forge
We are ij-solutions, Atlassian Marketplace partner since 2019, and this is the story about us and Forge. We explain how we started with Forge, what we did so far, what difficulties we faced on our way, and what we plan to do in the future.
Getting started with Forge
My name is Jonas and I am Co-Founder of ij-solutions. I am not a developer, but an experienced Jira and Confluence admin. I know administration, configuration and customization of Atlassian tools in on-premise and Cloud environments quite well. Also, I am familiar with scripting and implementation of various automations in Jira server.
However, when we started to look at Forge early 2020 and no developer had the time to do so, I started to work with Forge myself. My first app development experience began. This is what I did in the beginning:
Read the getting started page: https://developer.atlassian.com/platform/forge/getting-started/
Installed the Forge CLI
Ran through the tutorials for Jira: https://developer.atlassian.com/platform/forge/build-a-hello-world-app-in-jira/
Checked the dev references: https://developer.atlassian.com/platform/forge/manifest-reference/
Checked the example apps: https://developer.atlassian.com/platform/forge/example-apps/
Of course, Forge wasn’t that far developed and before GA back then. So, only parts of today's documentation even existed. Important functionalities were missing, but for my purposes it was worth giving it a try and invest some time to get to know it better.
The tutorials have been straight forward, and everything went well. But to be honest, what do you make of an app that displays “Hello World” on an issue panel in Jira? You need to have an idea in mind of what you want to do and what you want to build. If you work with Atlassian tools and know them well, maybe even administrating them, you probably have numerous ideas and use cases for nice apps in your mind that could enhance the functionalities of the tools. As we already had an existing server app (Epic Clone), which was lacking a Cloud version back then, it was the perfect starting point to do something more useful with Forge - migration of a server app to Cloud.
From server app to Forge (UI Kit)
The server version of Epic Clone can be used in epics to clone the entire epic and all the issues in epic in one action and even to a different project. When clicking on more → Clone Epic Template in an epic, a servlet opens where users can configure what to clone, select the target project and edit certain fields.
UI Implementation
To use the servlet concept in Cloud wasn’t possible and also Forge didn’t provide a module for it. Therefore, the decision was to use the issue action module and display the apps content in a modal dialog. This seemed to be practicable as we knew it wouldn’t be possible to include all functionalities of the server version from the beginning, thus the content displayed would also fit on a modal.
Starting with a blank modal I checked what is available in Forge UI Kit to implement and display different fields that would be needed for cloning. I made myself familiar with
UI Kit Form
Select field
Checkbox field
Text input possibilities
User picker field
I added them step by step to my modal to get to a first draft of the form I wanted to display to app users later to configure their template clone. The documentation is great for that purpose, you find every information you need to set up the form: https://developer.atlassian.com/platform/forge/ui-kit-components/
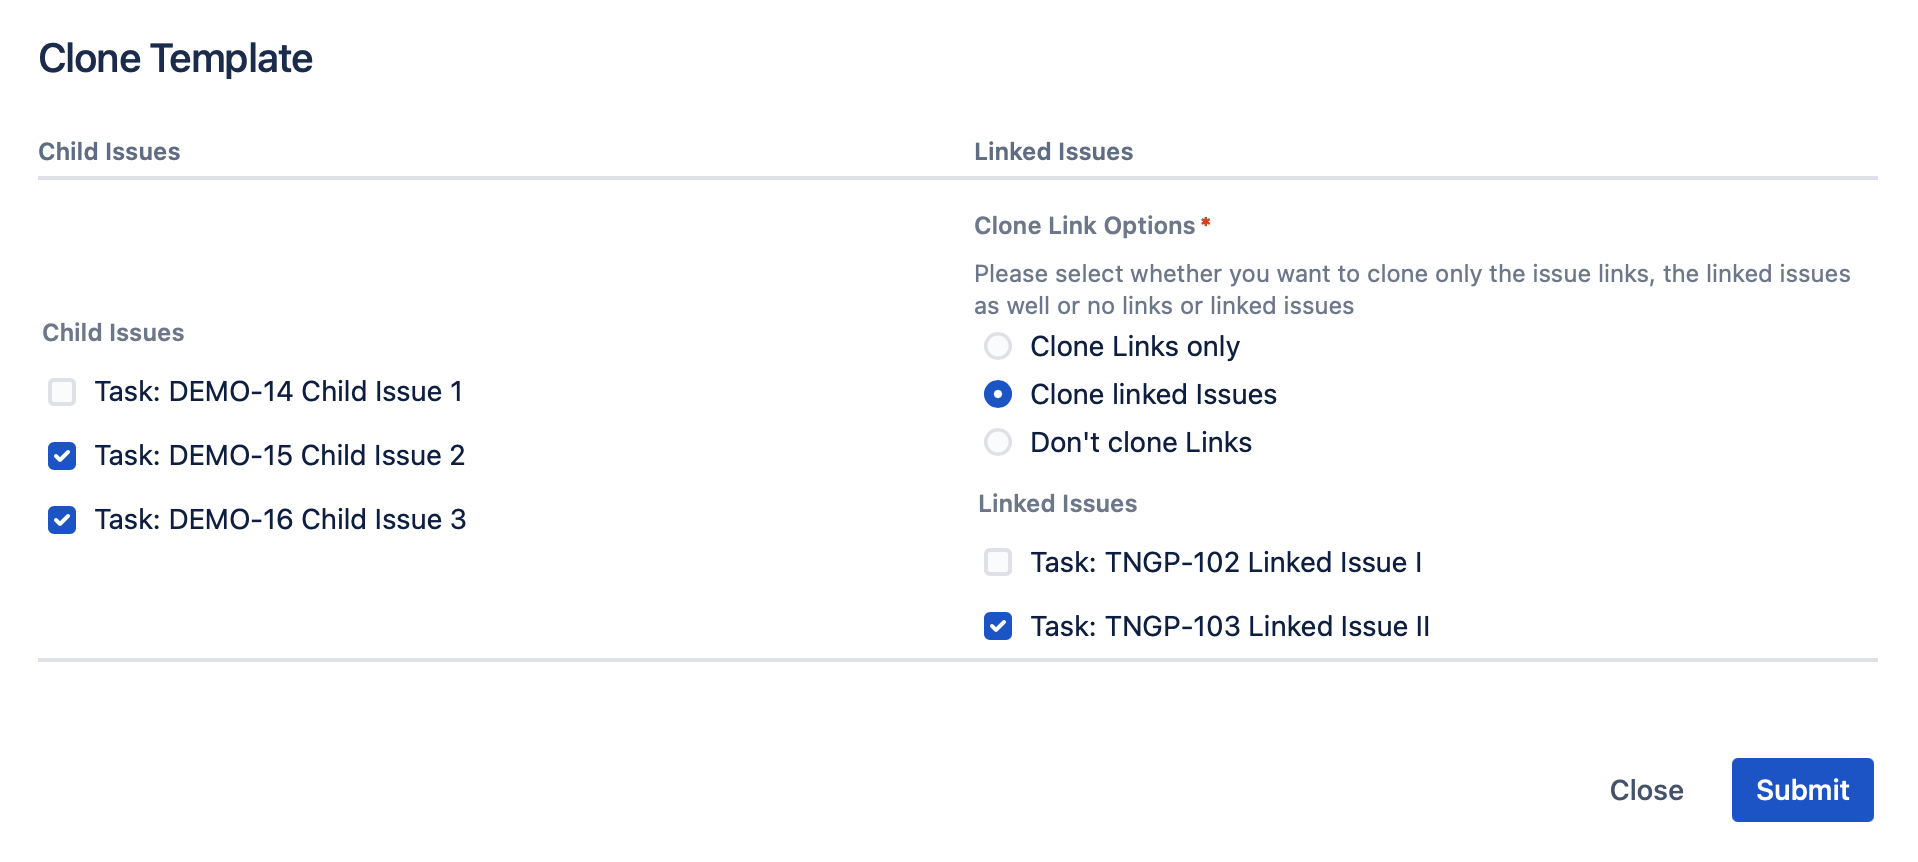
The arrangement of all the form fields was a challenge as it should look clear and compact and not confusing for the user. We decided to display the fields in a table so we could use several columns. Here we came across the first limitation with UI kit. It wasn’t possible to set vertical alignment in the table cells. I wanted to do that as not all fields with description displayed next to each other had the same height. It wasn’t a showstopper though, but the arrangement wasn’t perfect. This is how it looked like at the end:

The child issues to be cloned should be displayed on a second screen that should be visible when the user entered data on the first screen and then pushed the next button. We achieved that by using a useState hook and definition of a “form state” variable that was updated whenever a button on the modal has been clicked. The concept and usage of such hooks was completely new for me, and it took some time to get familiar with it. On the second screen we faced another limitation of UI kit as it wasn’t possible to display the issue type icon of the child issues between checkbox and summary inline. It would have been great as it is clear from the icon what issue type it is. As it wasn’t possible to implement, we displayed the issue type as text. It looked like this
Backend implementation
After implementing all those fields and the different forms, I started with implementation of the actual cloning procedure. It wasn’t that difficult and could be implemented quicker than the UI part. However, when running the first tests also on larger issues, I came across several problems.
Payload size: For some issues, the modal just didn’t load, and an error was logged that the payload for the request is too high. I had to clean up what was loaded and removed everything that isn’t absolutely necessary for cloning. As I didn’t consider before what was actually needed, just everything was loaded, so all projects with their configuration and available issue types, all types of Jira fields necessary for creation of the different issue types. For some of those, the information was loaded even twice, so it was clear where this error message was coming from.
Invocation timeouts: Cloning failed especially for issues with many child issues as the invocation timeout was reached during cloning. The timeout was set to 10s at the beginning which was challenging. The solution was to call requests concurrently and run them in parallel. A concept I had to get familiar with as well, but finally it helped to get the cloning done within the 10s. Today, the invocation timeout has been increased to 25s which was an improvement and provided more time for the actions your app is doing.
Although those issues have been challenging and produced many errors during testing, they can also be seen positive. It requires to make your app lean and fast, and to load only what is necessary. If you only have 10s until an action needs to be completed, that means that also the user will have to wait only 10s later on until the cloning (in this case) is completed. Especially if you don’t get any feedback on the actual progress of the operation, like it was the case here with UI kit, it is important that users don’t have to wait too long until the process is completed. Otherwise, they might think that something is wrong or that the app isn’t useful for what they want to achieve.
Improvements
The above-mentioned improvements for execution time and payload were necessary as the app didn’t work otherwise. Other improvements have been made to make the apps code more structured and better to understand. At the beginning, we wrote the entire code in one file (index.jsx). In order to have a better structure, the apps code has then been separated into the following files:
index: Modal dialog with form and different screens
components: Single form fields (UI kit components)
fetchdata: Rest APIs to get information like projects, issue data, fields, etc.
core: Main cloning function, which is called from the index file
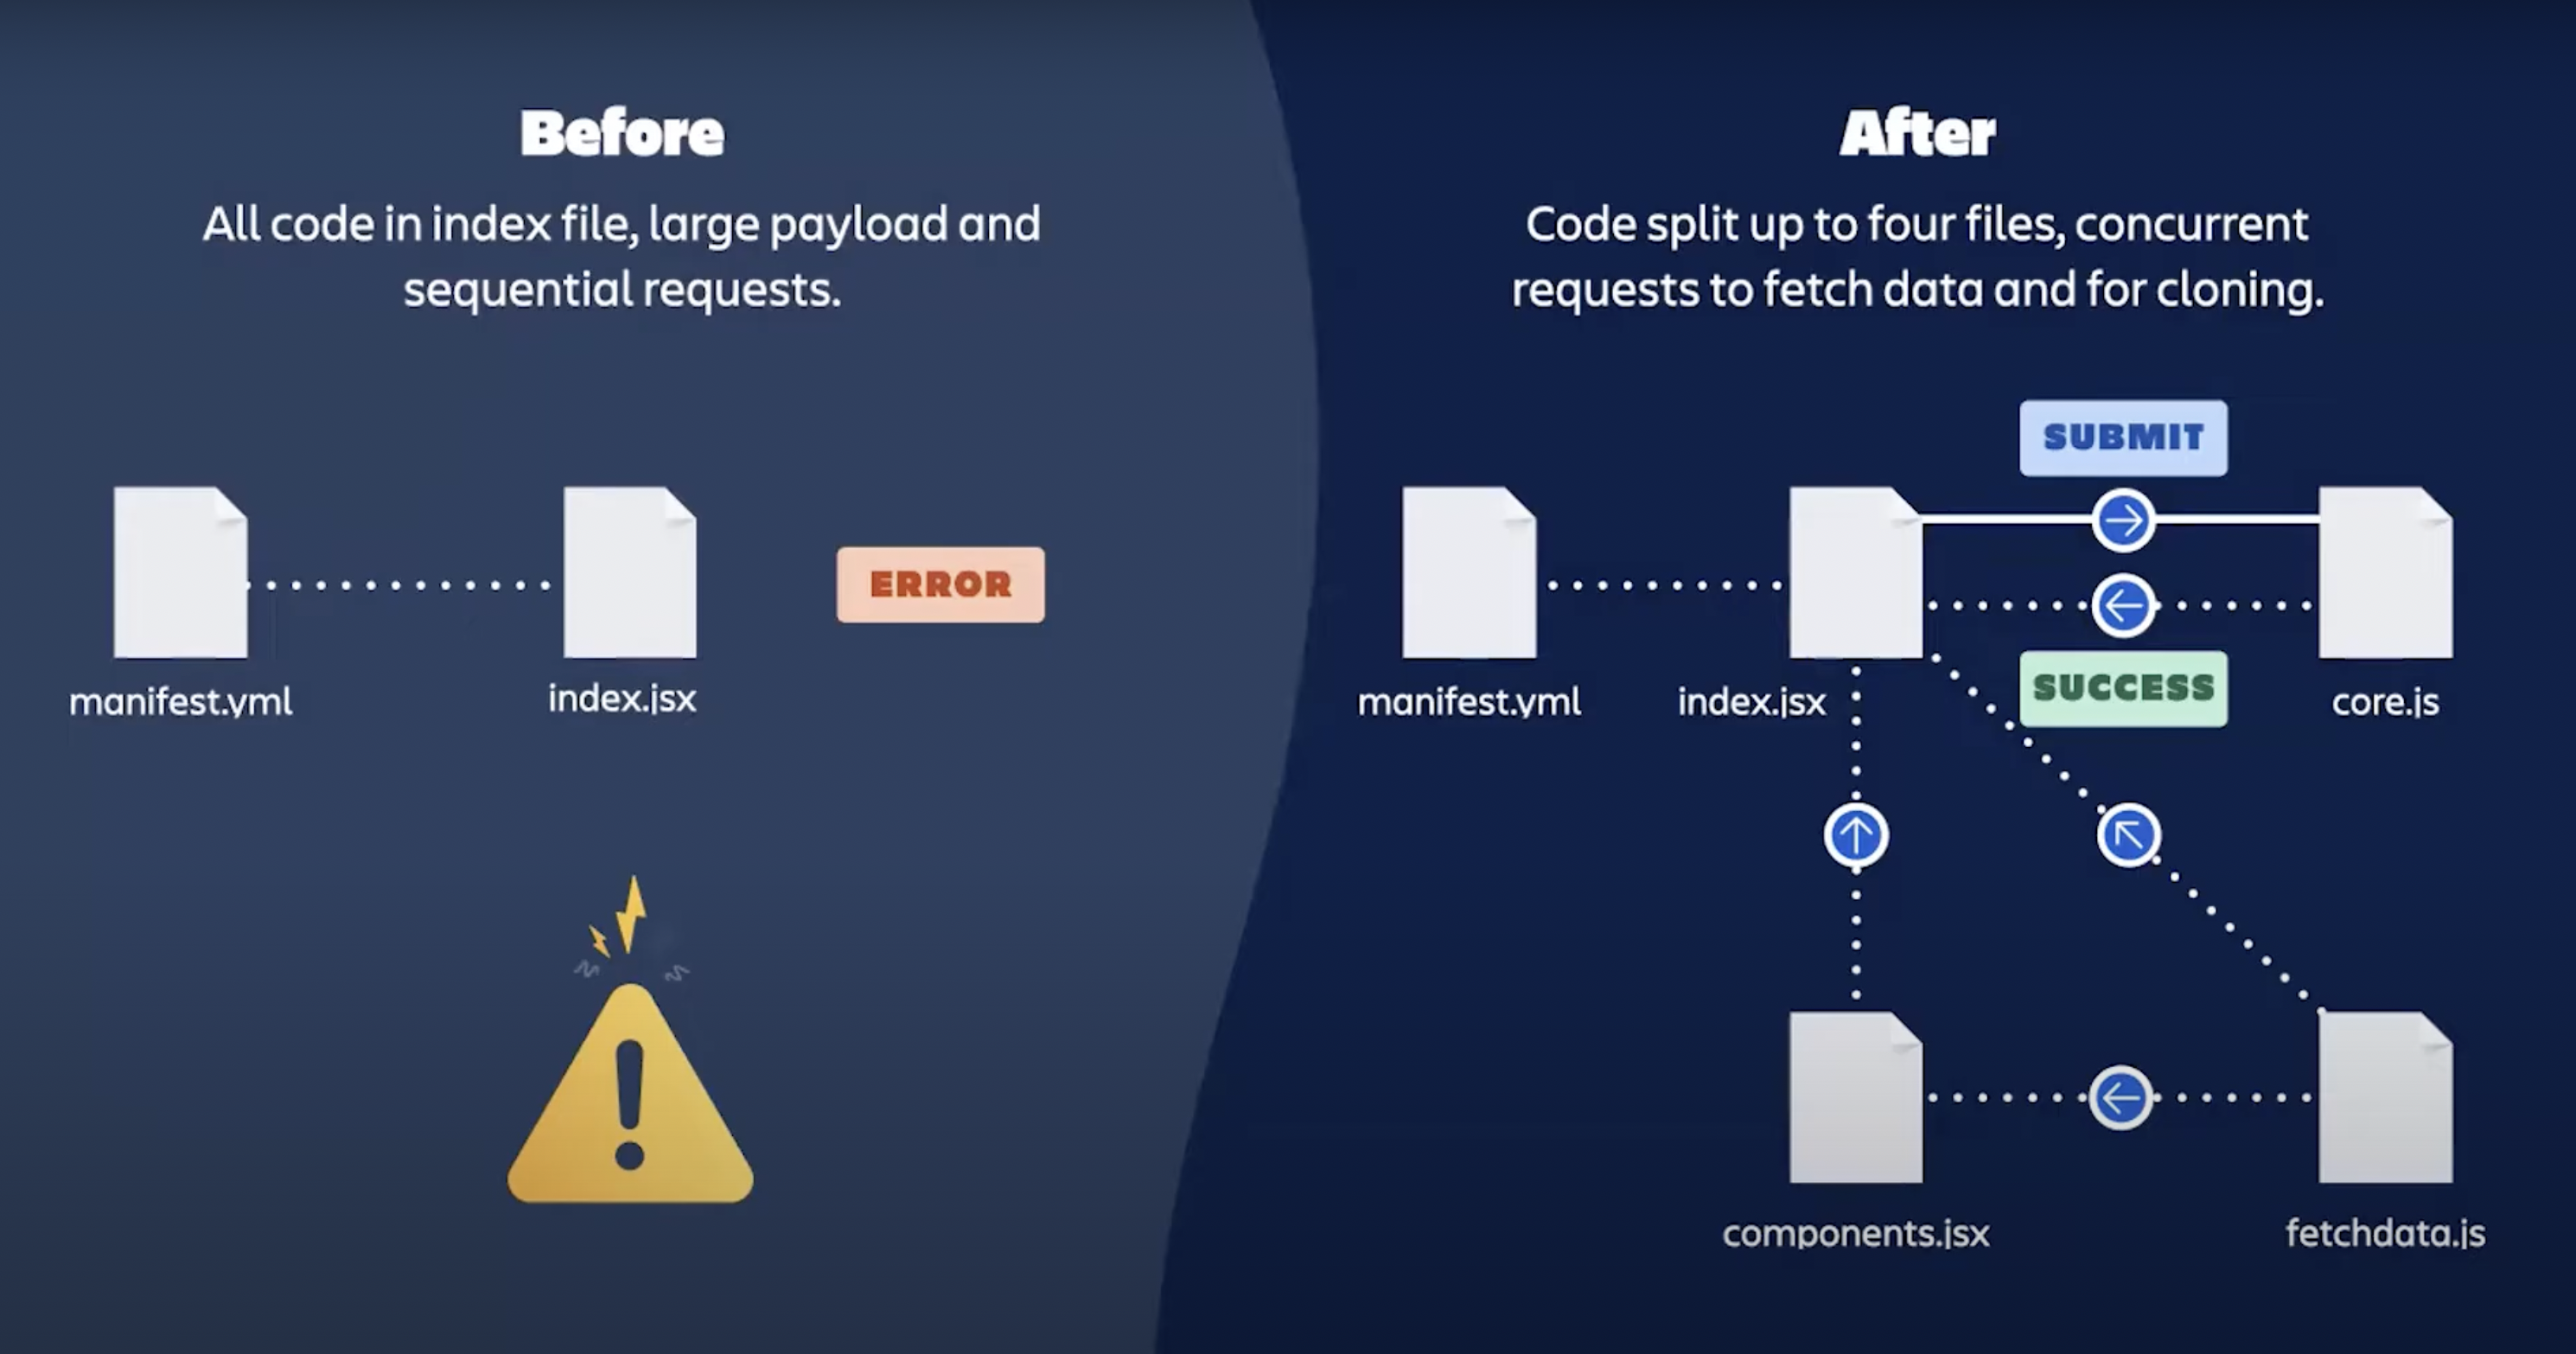
There was one additional improvement we made, which even resulted in an additional feature compared to the server version of the app and which came due to a limitation in Forge in the beginning. When we started developing, it wasn’t possible to add display conditions to the issue action module, so it was visible to everyone in every Jira issue (today it is possible). Due to that, we weren’t able to limit access to this cloning feature only to Epic issue type like it is in the server version. We thought it might be a useful feature also for other issue types with child issues to clone them to different projects (not possible with the default clone functionality) and to decide which child issues to clone and which not. Due to the lack of display conditions, we even enhanced the functionality of the app. So, sometimes also limitations can lead to improvements.
If you are interested in more details on the migration of our server app to the Cloud using Forge UI kit, check the following video from Dev Day 2021 with an interview where I shared my experiences and with a short app demo.
https://www.youtube.com/watch?v=0n9Auiz90RIFinally, we achieved to develop our first Jira Cloud app using Forge UI kit and publish it on the Atlassian Marketplace. Even if some features were missing compared to the server version, we received positive feedback and several of our customers who migrated from server to Cloud continued to use Epic Clone, now as Cloud version build with Forge.
From UI Kit to Custom UI
Although the app migration to Cloud went well and the customers were happy, there were still limitations with UI kit and not all features from server could be migrated to Cloud with UI kit. The obvious solution seemed to be to change the app to use custom UI instead as it promised to be more flexible and to provide various additional possibilities.
Everything new with custom UI
Therefore, in 2022 I started again to learn something new. Ok, not completely new as I already knew Forge and also did run through the one custom UI tutorial that exists before. The goal was to migrate the existing Cloud app Epic Clone to custom UI to be able to add missing features and improve the user experience. The tutorial app only displays “Hello World” in an issue, which isn’t that helpful when you want to build something more complex. Luckily, at least one sample app exists that uses custom UI, and I used it as starting point to learn about custom UI, how things can be implemented in a more complex app and how frontend code and backend functions are related. However, probably most helpful was that, again, I didn’t start from scratch. I knew that I would need an issue action module, a modal dialog to display and I knew about the fields that should be placed on the cloning form. Also, the concept with an initial screen for project selection and parent issue information, and a second screen with child issues should remain.
In custom UI apps static resources need to be defined where the fronend code is located. This frontend code communicates with the backend functions via the Forge bridge, it is calling backend functions and receives information to display. The first challenge was the tunneling which works differently than for UI kit apps. It is required for development to see changes immediately on the screen after saving a file. It is necessary to run a react app with your frontend code before starting the Forge tunnel to also see frontend changes in your browser. After I got that to work, it was sometimes confusing as I expected the logging in the terminal window where the tunnel was running. However, for the frontend part, logs are displayed in the browsers dev console. That was something I needed to get familiar with especially as I only developed with UI kit so far.
Furthermore, also a new type of file, type script, came into play during development. As I took files from the example app as starting point and those were written in type script, I kept especially the forms and form fields in type script files. Again it was something I had to learn and get familiar with, e.g. that each variable has to be declared with a type and functions need types and explicitly defined variables as input. However, at the end I liked to write code in type script and it was something new I learned.
UI implementation
The development approach was similar to when we did the initial development with UI kit, we did it step-by-step and field by field to populate the modal with all necessary information. The styling of the fields was more difficult though as it wasn’t enough to just add them like with UI kit. Stylings like margin, padding, or overflow had to be applied to make the entire form look good. But on the other hand, custom UI provided great new opportunities to implement a better user experience. As examples
Component and fix version fields could be added which change their selection values immediately after new target project has been selected
Component and fix version fields are hidden instantly when a team-managed project is selected as target project, as those fields are not available in team-managed projects
When a new target project is selected, it is validated if the issue type of the source issue is available in that project and an error is displayed if not
Issue checkboxes show the icon of the issue type instead of issue type name as text (not possible in UI kit, see above)
Issue checkboxes are automatically disabled if the issue type is not available in the target project
Child issue checkboxes are automatically disabled if their parent issue is deselected for cloning
This list is far from being complete, but it shows how much is possible when using custom UI.
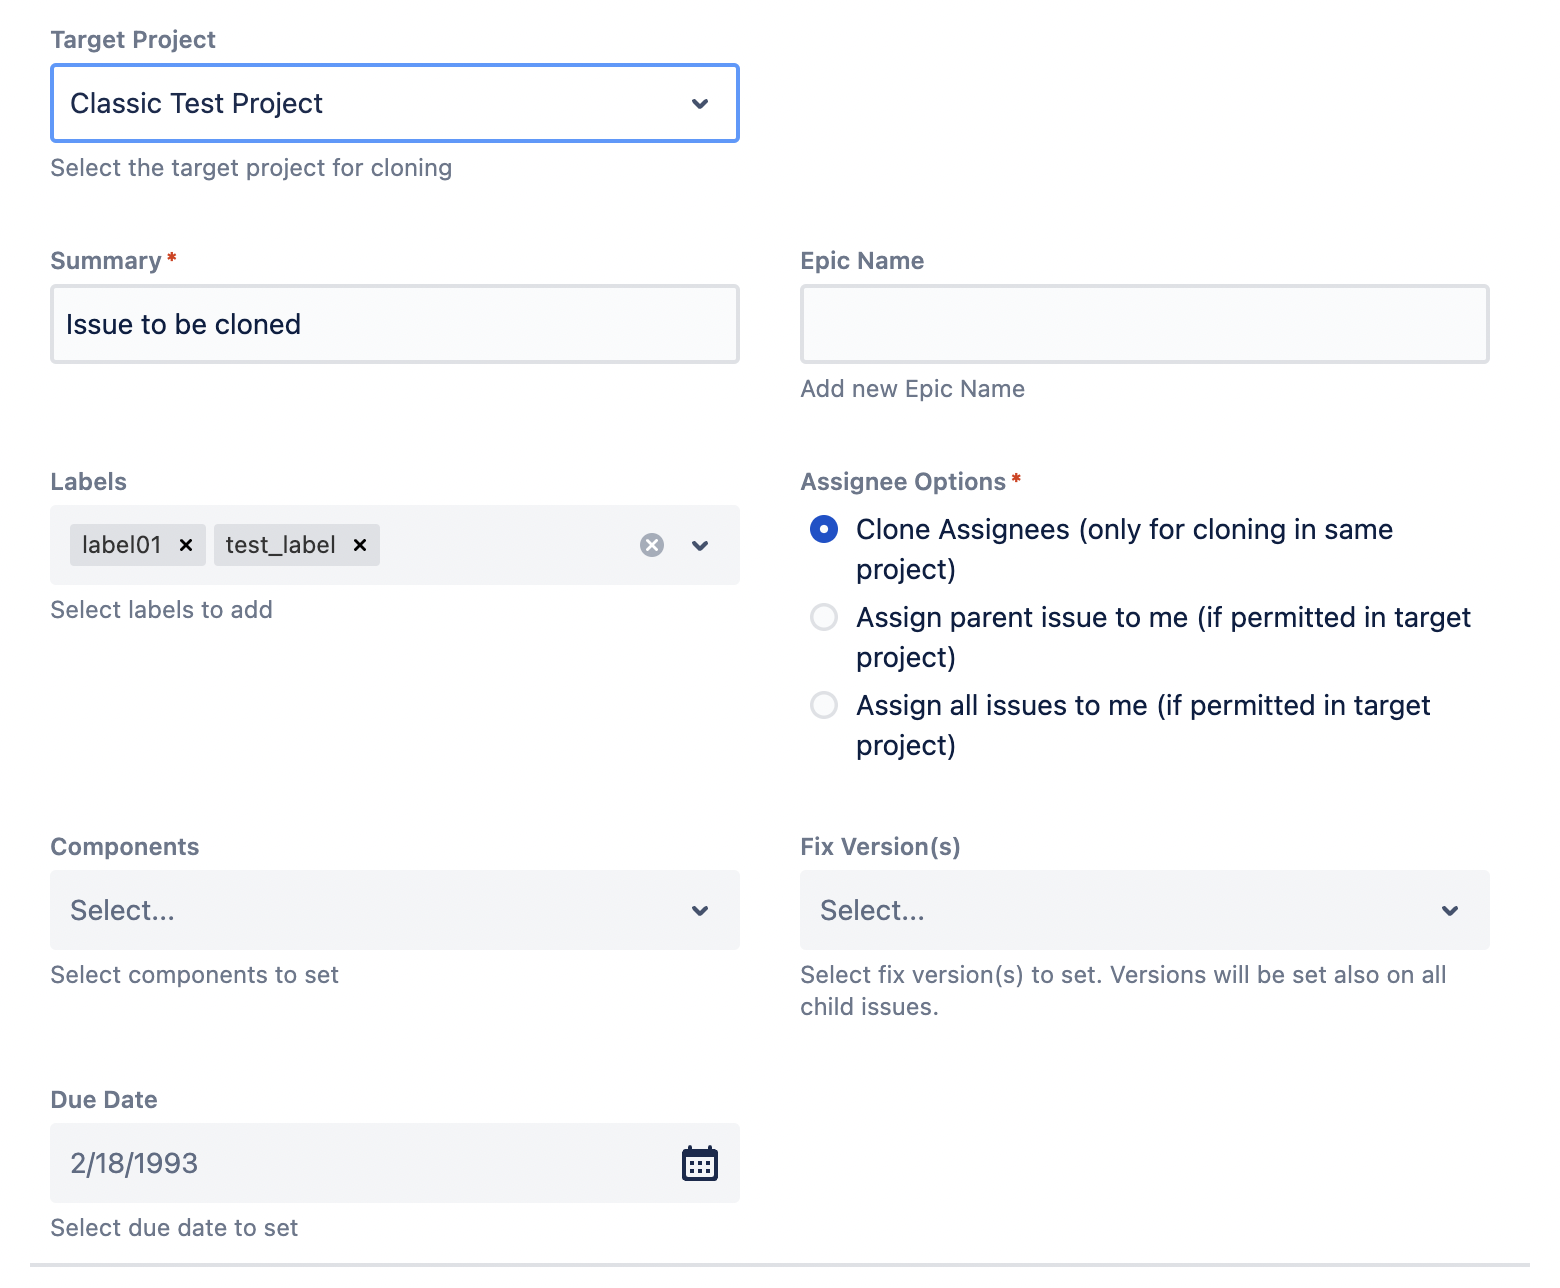
Finally, the first cloning screen looks like this
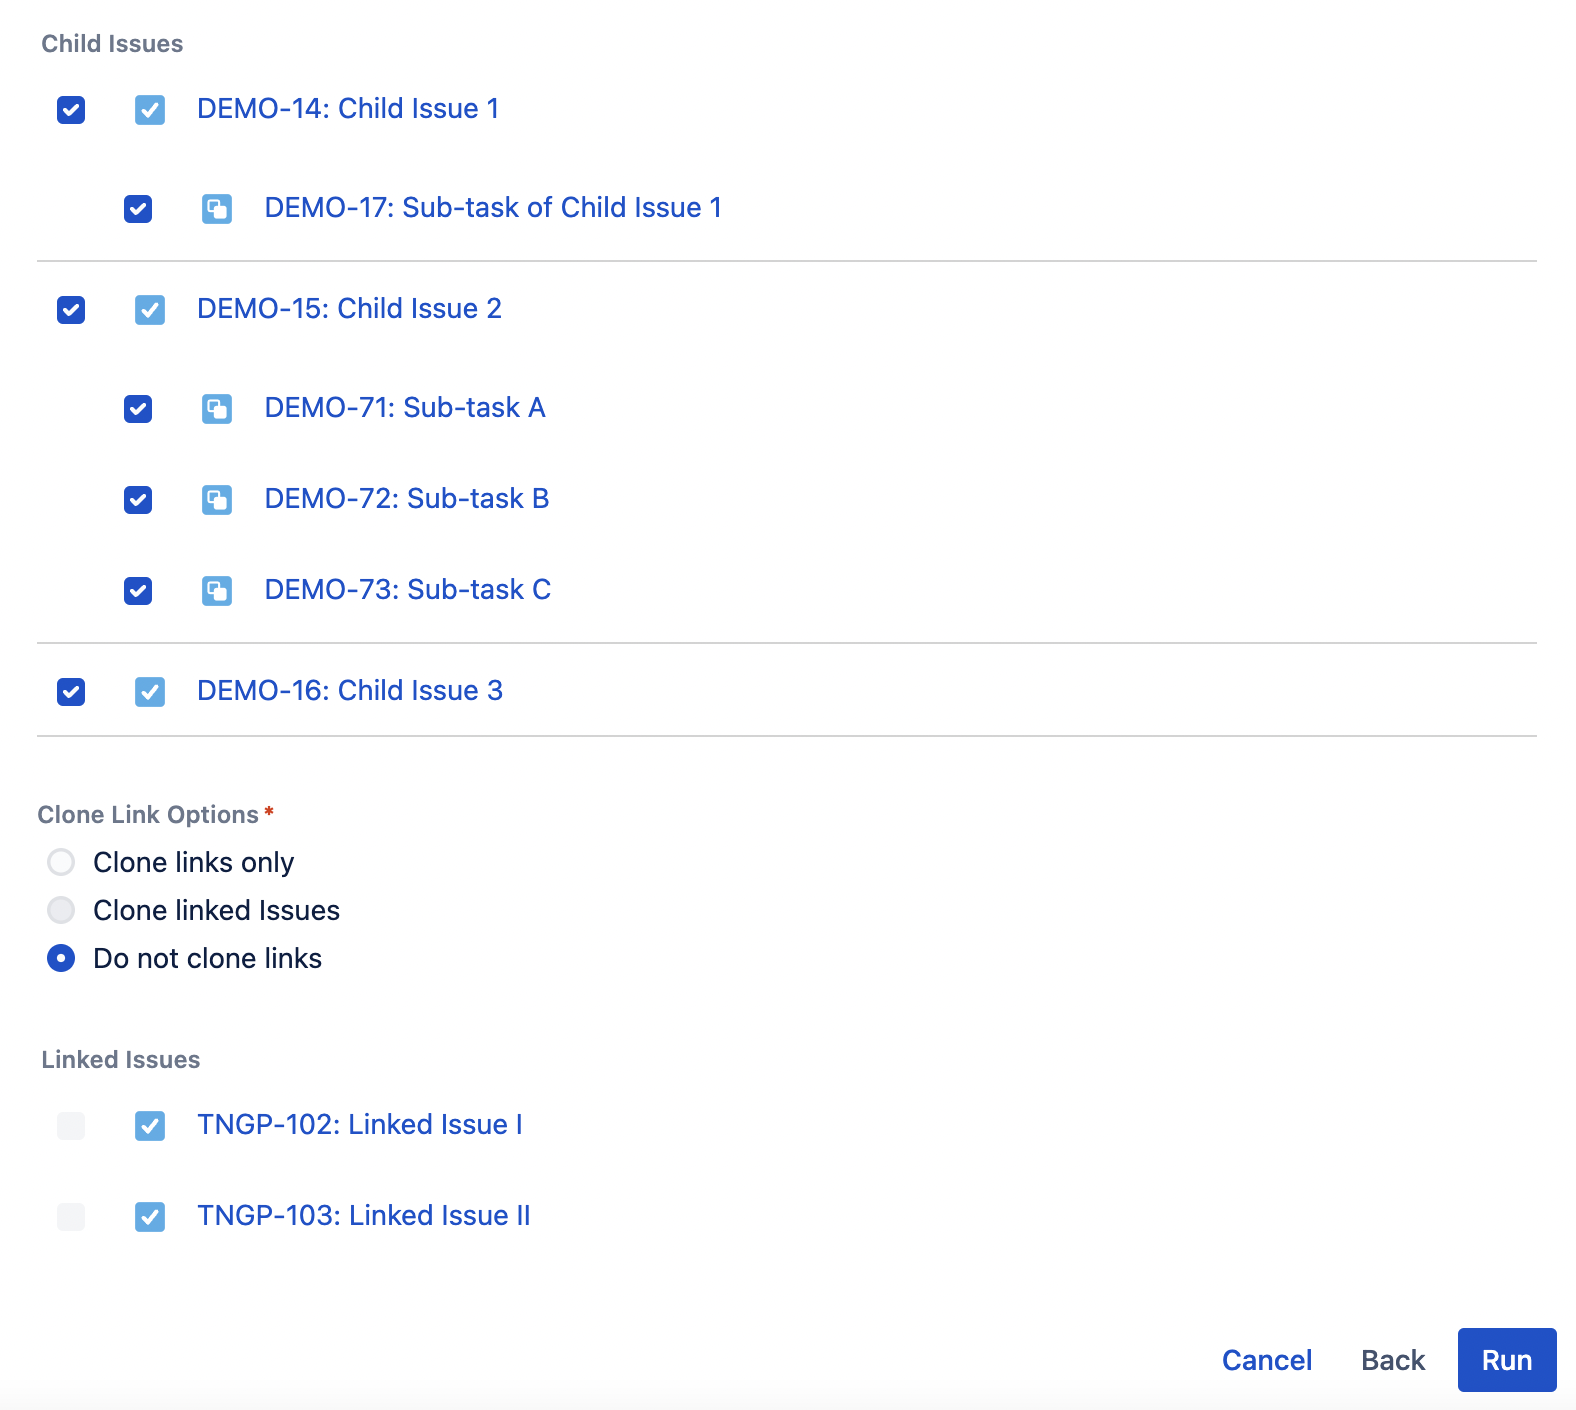
whereas the second screen with child issues to be cloned is displayed like that
Switching of screens was again achieved by using a useState hook with a form state variable.
Backend implementation
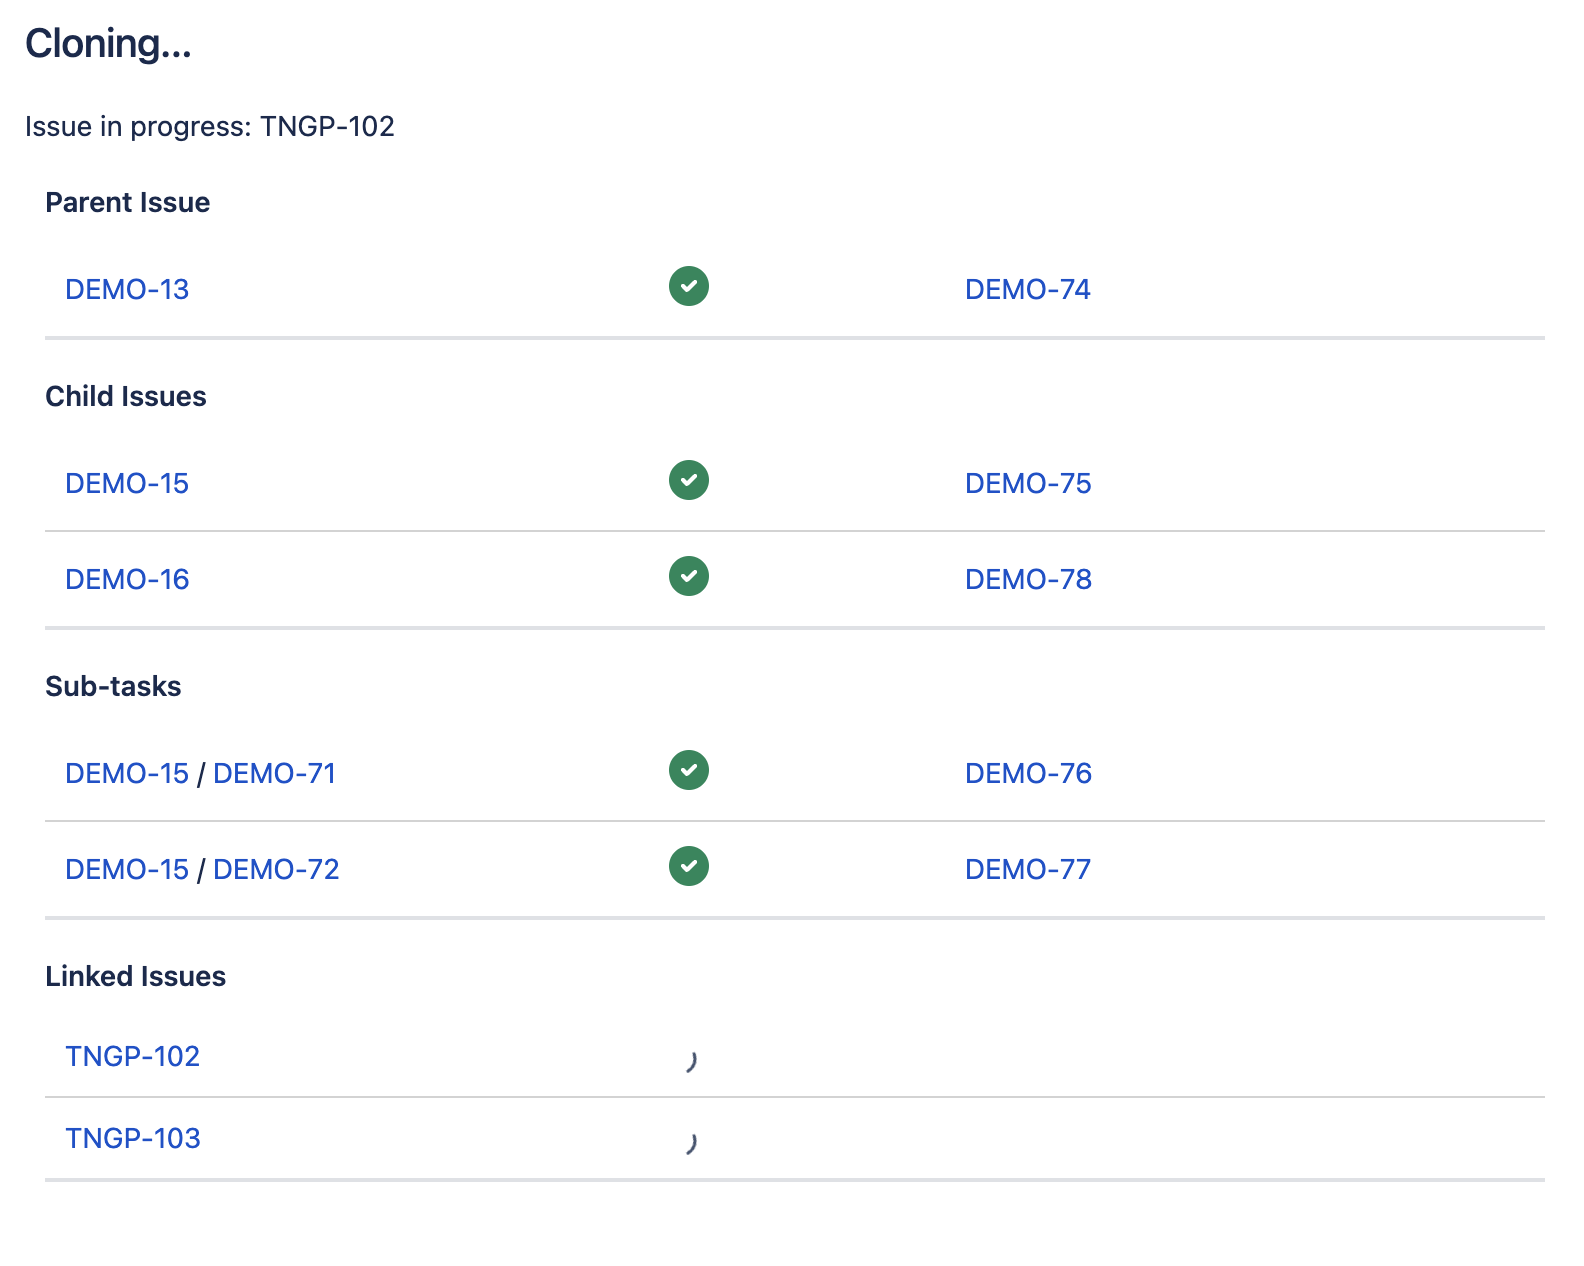
When it came to implementation of the actual cloning functions, it started to pay off again to decide to switch to custom UI. Whereas in the previous version, the user hit the run button once and started the cloning function, which completely ran in the background with no feedback on the progress, it was now possible to display cloning progress information live on the screen. What issues have already been cloned? Which ones are still to do? Which issue is currently cloned? All that can now be displayed on the screen when the function is running. We implemented that by sending the cloning requests sequentially from the frontend to the backend functions, starting with the parent issue, followed by child issues, sub-tasks and optionally linked issues. Whenever one issue is cloned successfully, the fronend variables are updated and the users sees this updated information immediately.
For the user, it is displayed on the result screen which issue is currently in progress, which issues are done, and which ones are pending. This is a great improvement compared to the situation before where only there was only something displayed when cloning was completed.
By changing the app to custom UI, several features could be implemented that weren’t possible before and so the Cloud version made a huge step forward. The feature gap compared to the server version became smaller and will hopefully be decrease even more in the future. In this regard we also depend on the further improvement of Forge as for example, cloning of attachments is not yet possible in a Forge app.
Building a Custom UI App from scratch
For Codegeist 2022 we built a new custom UI app from scratch. It is called Project Milestones for Jira. This time we didn’t have something that we migrate from server to Cloud where the concept was already defined. We decided to do something new with a part of Forge we didn’t used before.
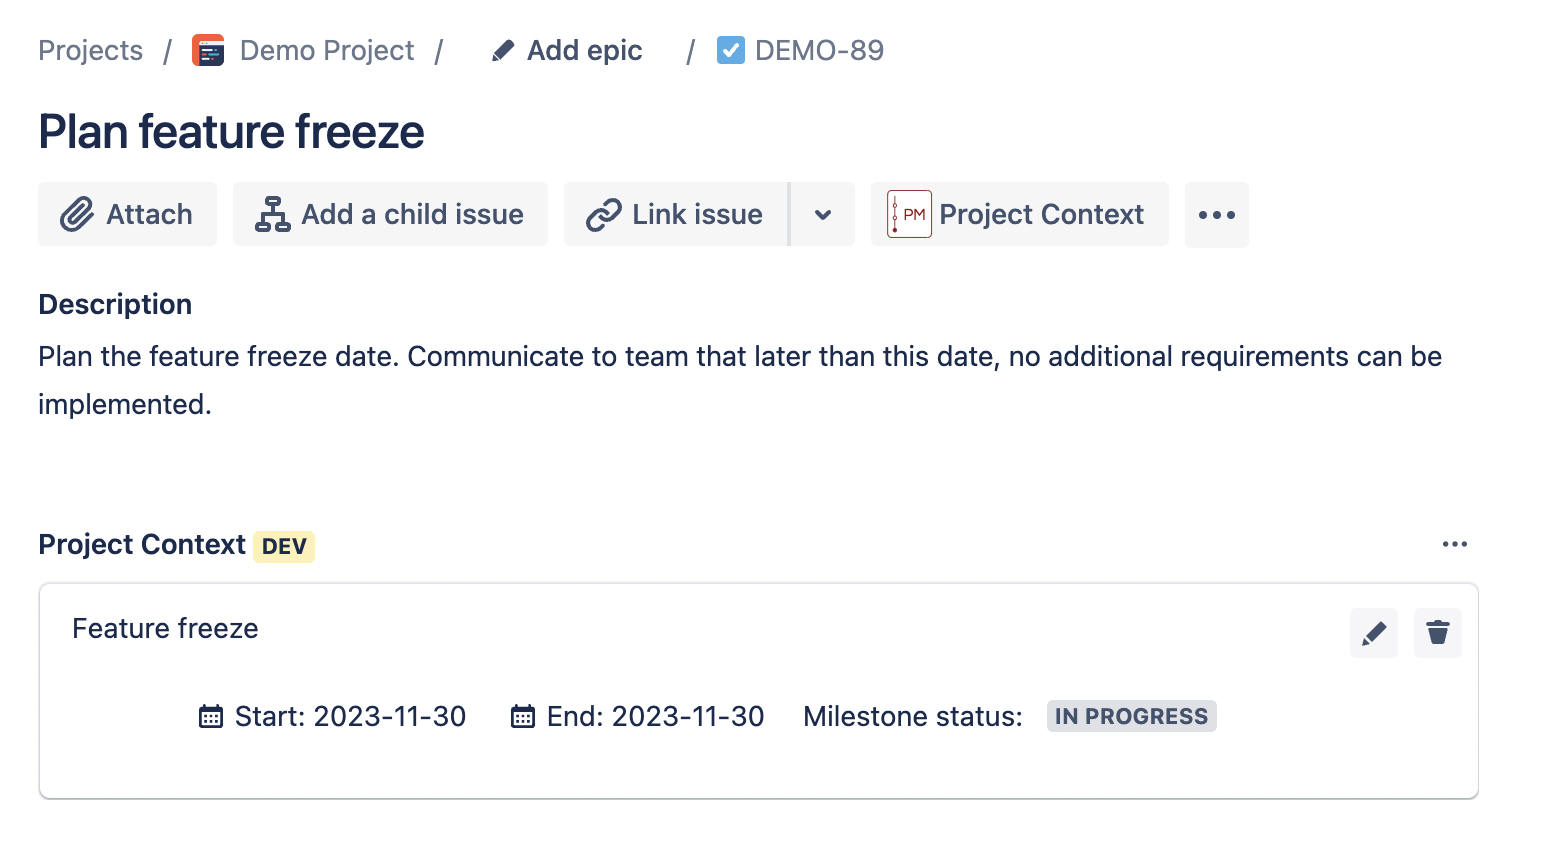
The project milestones app adds a project page to each project in Jira where users can split up their project into smaller pieces called milestones. Imagine you have a large project running for several years. Of course, you can summarize issues in epics and plan stories in sprints. But sprints usually have a length of 2 weeks. What about the long-term goals and steps that needed to be achieved during the project? They can be planned with the project milestones app.
The project page module in Forge was something new to us and also, we started with a blank page we had to fill with content. Furthermore, it is the first app where we don’t take content from Jira and modify it (like with Epic Clone), but we create our own app content and store it in a project. For that purpose, we used the Forge Properties API. Beside the project page we also add an issue panel which can display information from the project milestones in a Jira issue. That means that with this app we have 2 Forge modules in one app for the first time.
UI implementation
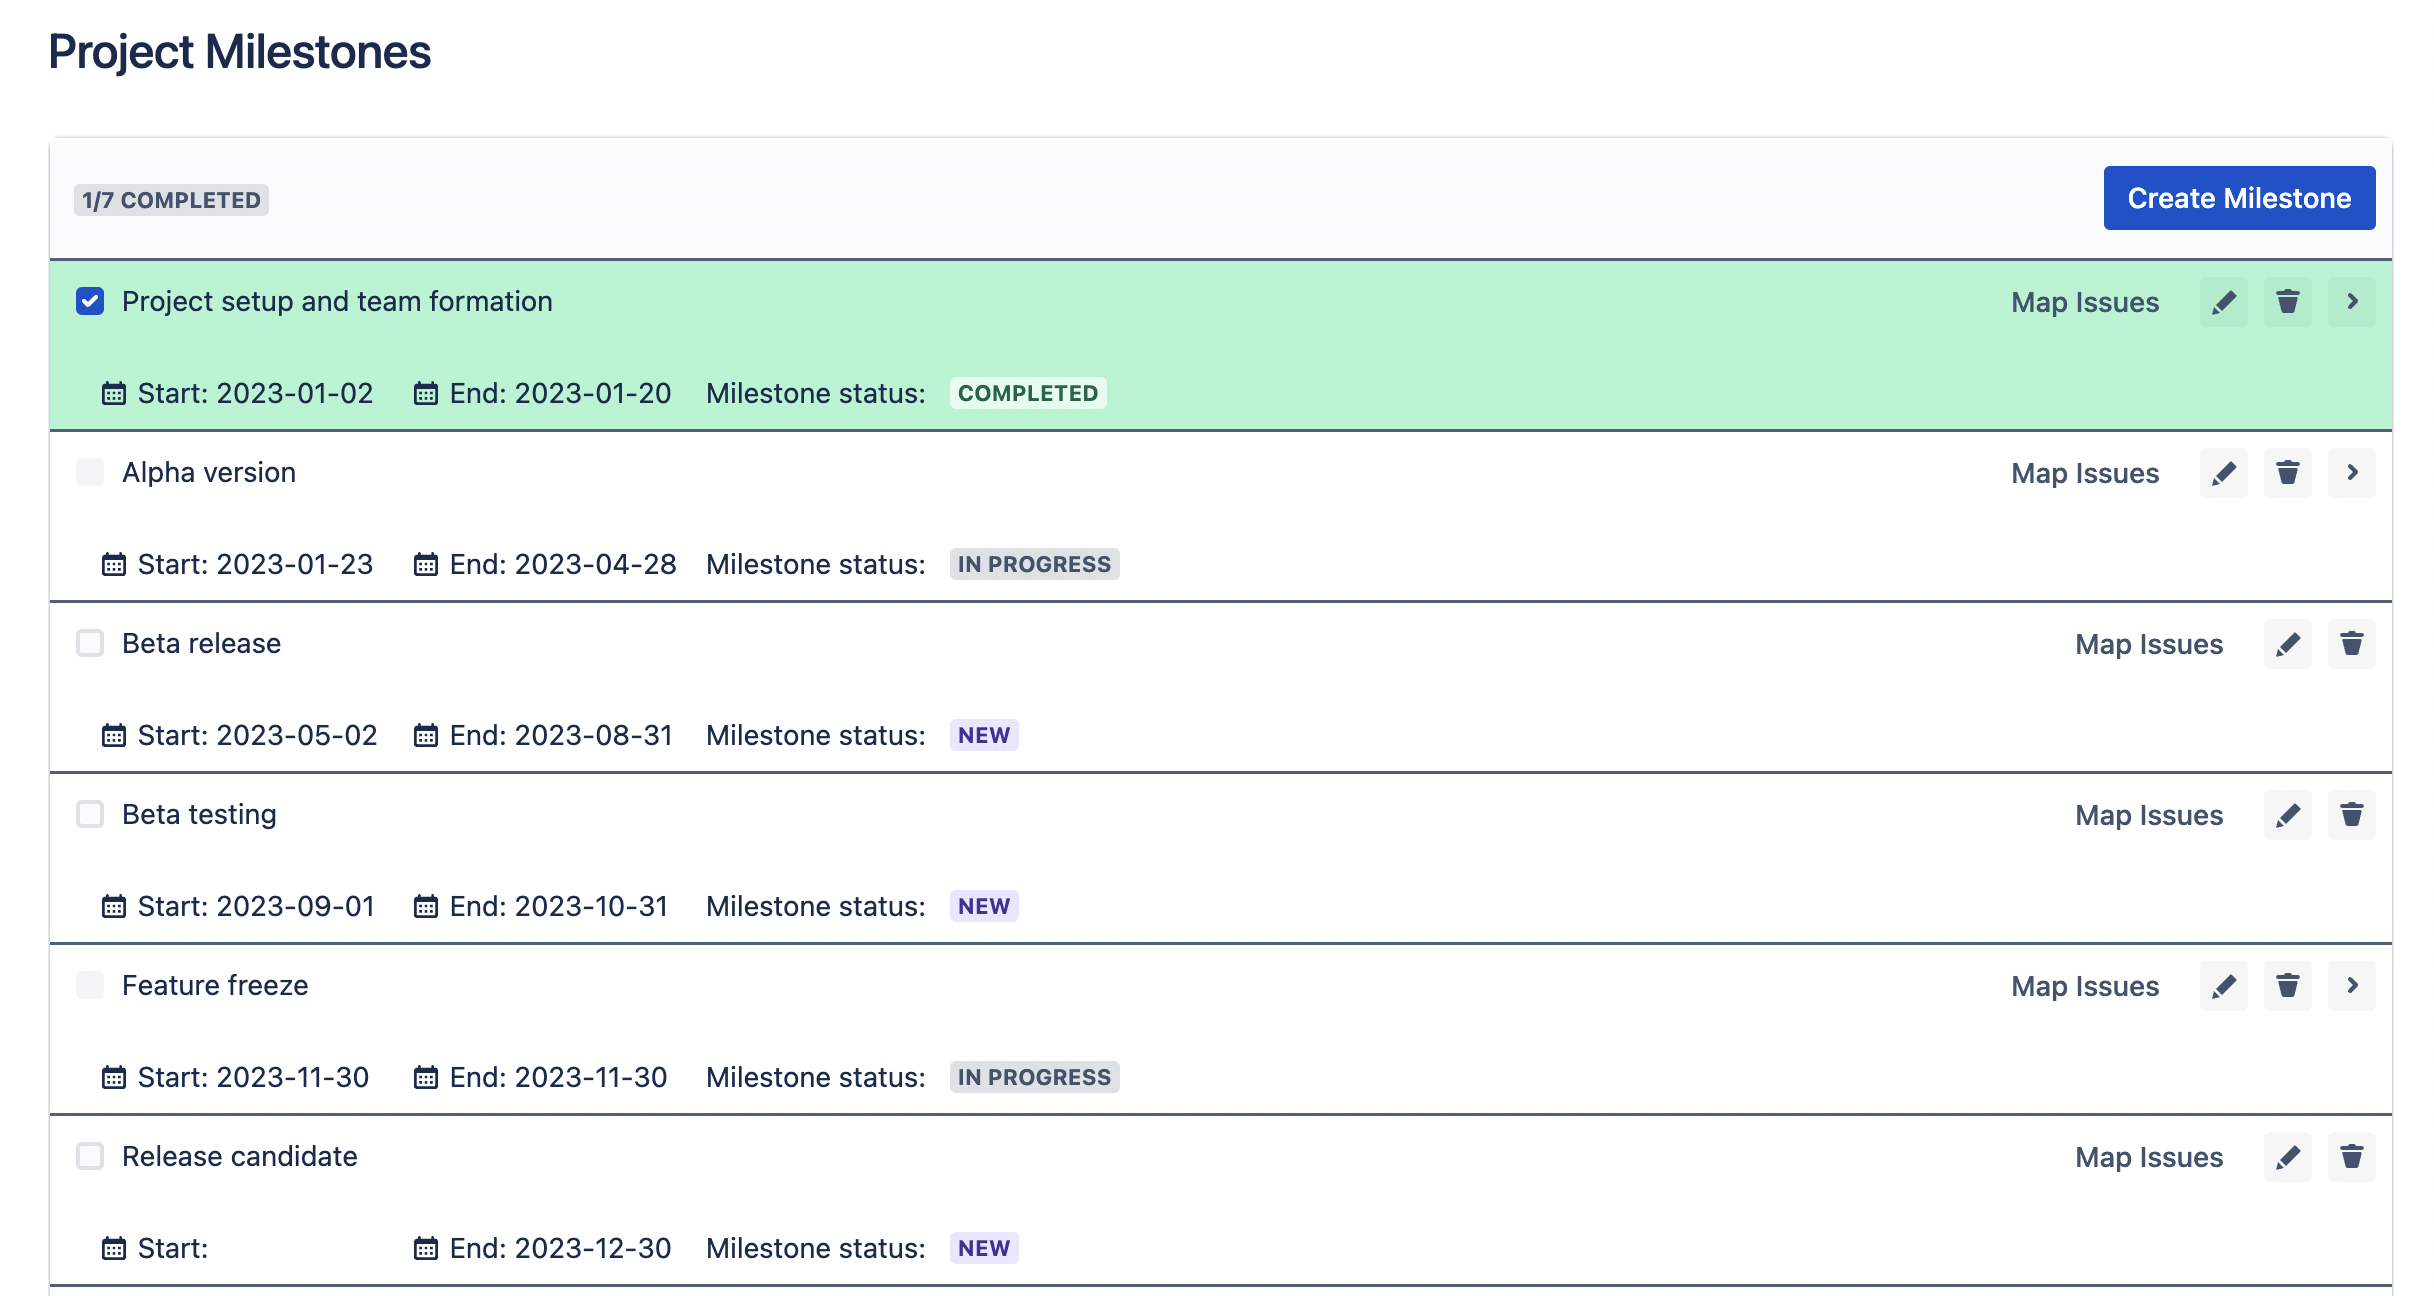
When looking at the frontend implementation, the most challenging part was to fill the blank page with content. We realized very early that just adding some information to the page makes it look weird and confusing. We had to use custom styles to arrange the list of milestones appropriately. For that purpose, we used styled div and span elements loaded from a styles file where they are defined. What was new to us was that we are able to pass attributes to the styled components which change their appearance. As an example, we added the information if a milestone is complete or not to the styled components and when it is completed, it is displayed with a green background. If not completed, the background is white.
The scrolling behavior on both project page and in the issue panel was a challenge. With wrong settings, the buttons on a modal dialog suddenly moved outside of the dialog or content flowed over the borders of the page. It was tricky to find the right settings but finally we managed it for project page and modal dialogs. However, for issue view we are still not completely satisfied with the scrolling behavior and try to find a way to e.g. show a select list that to be displayed also partly outside the panel borders.
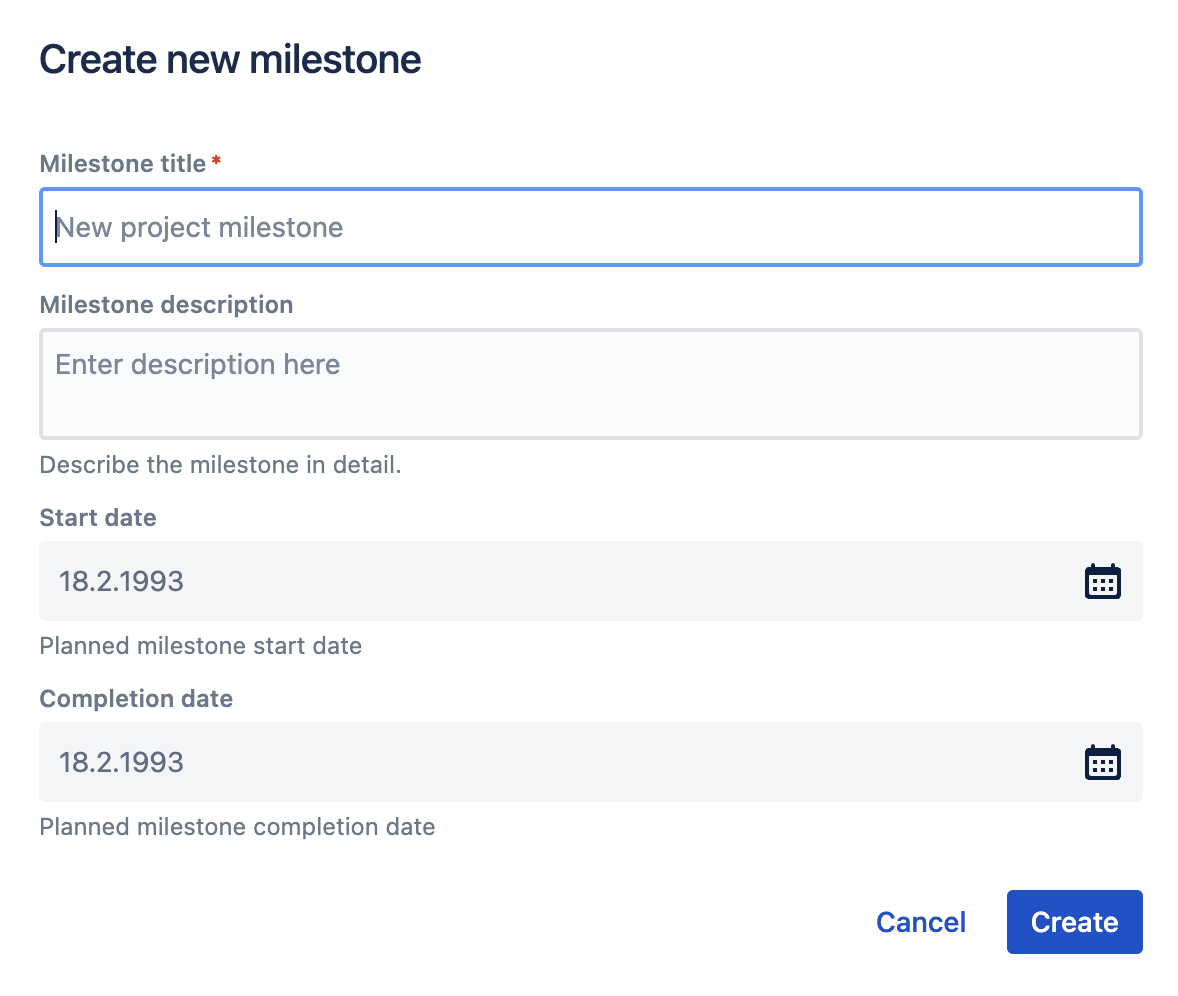
For the issue view, it was another challenge to make editing possible and look nice directly on the issue panel. At first, we tried to implement modal dialogs as we did it for editing on the project page. However, as we selected a small size for the panel, the dialog finally only displayed within that panel, so it wasn’t visible at all. After searching in the community and looking into the documentation, we finally decided for something else as displaying a modal dialog from an issue panel but in front of the entire issue seemed to be too complicated. We now display the milestone select field directly on the issue panel so users can make changes directly there without a modal dialog that pops up.
The following screenshots provide an impression of the frontend implementation of the app.
Backend implementation
As mentioned above, we needed two Forge modules in one app, which was something new. At first, we tried to implement it by adding another static resource folder and linking it in the manifest to the issue panel module. However, this didn’t work as we got error messages saying that, for instance, certain hooks are already in use and can’t be used twice. The display of the issue panel worked fine, but as soon as we wanted to implement a button that changes a variable via a useState hook, the error appears, and it didn’t work as expected. Looking into the community helped to find a solution here. We use the following code on top level in our App.js file to distinguish between context. When we are in the project page context, the project page code is loaded, whereas when we are on issue level, the issue view code is loaded.
import React, { useEffect, useState } from 'react';
import { view } from '@forge/bridge';

import IssueView from './pages/IssueView';
import ProjectPage from './pages/ProjectPage';

function App() {
  const [context, setContext] = useState({});
  const [isDetectingContext, setDetectingContext] = useState(true);

  useEffect(() => {
    setDetectingContext(true);

    view.getContext()
      .then(setContext)
      .finally(() => setDetectingContext(false));
  }, []);

  if (isDetectingContext) {
    return <div>Detecting context...</div>;
  }

  switch (context.moduleKey) {
    case 'pci-project-page':
      return <ProjectPage />;
    case 'pci-issue-panel':
      return <IssueView />;
    default:
      return <div>Cannot Detect Context</div>;
  }
}

export default App;
Again, the community helped in this case as we obviously weren’t the first developers with that problem.
The properties API was also something new to us we didn’t use before. We chose it instead of the storage API as we remain in the project level and don’t need to store information on top of that or information that needs to be shared across projects. The properties API seems to be the right solution for it. We used the example app as a blueprint as it is using the same API for storage and modified the code, so it fits to our purpose. It was great that we were quite flexible in how the data we store is formatted and that we could tailor it as we need it. When you define for your app individually how data is stored, there is no surprise on what you get when you read this data on a different loaction (e.g. in issue view). We were able to reuse code from the project level on issue view as it was the same data we read from the storage.
Compared to Epic Clone, the focus for the project milestones app was on the frontend. The backend part has been new to us, but it wasn’t that complex as it was for other apps we built so far.
Here you can watch a demo video of Project Milestones for Jira:
https://youtu.be/Gwr4dCsmEVc
What’s next?
Forge custom UI opened up so many new possibilities for us. We now migrated one existing app from UI kit to custom UI and built one from scratch. For both apps, numerous ideas for new features exist and we are looking forward to building them with custom UI. For Epic Clone we think about the following feature:
Cloning of attachments (as soon as it is possible with Forge)
Bulk clone of epics/issues with child issues (e.g. based on a filter or selection from project issues)
Improved cloning of links (clone also links of child issues; retain links of child issues among each other)
For epics: Adding an option to keep issues in epic in source project, whereas cloning of epic to a different project
Advanced settings, e.g. cloning only allowed for project admins or disable the app in certain projects
For Project Milestones for Jira our first goal now is to bring the app to market, so publish it on the Atlassian Marketplace. Furthermore, we think of the following new features for the future:
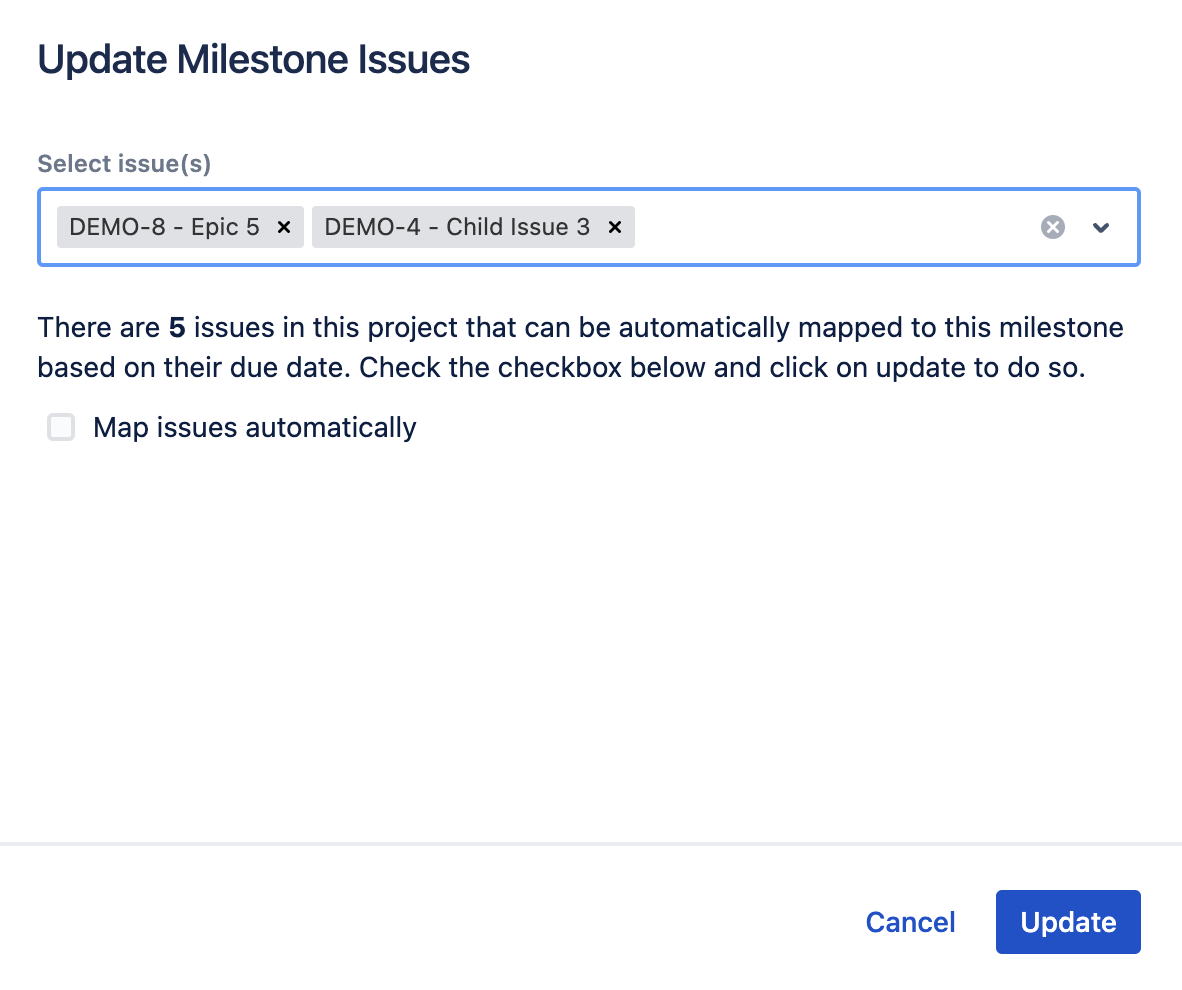
Map issues automatically to all milestones at once
Issue mapping based on other field than due date
Milestone approval workflow
Connection to releases - automated release creation
Link to Confluence documentation
Permission settings
As you can see, there is still a lot to do for us and we are looking forward to it. We hope you enjoyed our Forge story.
As always, if you have any questions, want to discuss something, or have any other request, feel free to reach out to us via info@ij-solutions.com or our Service Management.
This information is for all of our customers of Epic Clone and people who are interested in the app or evaluating it. We are proud to announce that we published a major update of the Cloud version of the app on the Atlassian Marketplace.
The new version contains several bug fixes and many new features we would like to list here.
Bug Fixes
Bug fixed that cloning did not work if issues where assigned to a sprint
Bug fixed that cloning did not work if user has set his language to French
Bug fixed that sub-tasks of child issues of epics haven’t been cloned
New Features
| 1 | Labels | Select list instead of text field for labels. Select new labels from a list of existing labels and create new labels during clone configuration. The selection of labels in Epic Clone is now similar to the label selection you know from issues. |
| 2 | Components | If the target project is a company-managed project, you can now select components from the project which will be set in the cloned issues. |
| 3 | Fix Versions | If the target project is a company-managed project, you can now select releases from the project which will be set as fix version in the cloned issues. |
| 4 | Due Date | Select a due date to be set. |
| 5 | New result screen | Get feedback during cloning which issues have been cloned and which are still to be done. On the new result screen you can not only see which issue is in progress and currently cloned, but also see a list with status of each issue you plan to clone. Quickly navigate to each source or target issue by clicking on the respective link (opens in new tab) |
All those new features are explained in our https://ij-solutions.atlassian.net/wiki/spaces/ECC with additional information.
New User Interface
We changed the appearance of the Epic Clone dialog and screens, so it provides more information and the additional features. This new user interface provides more flexibility and also possibilities to implement additional features in the app. So this update won’t be the last one and we plan also additional functionalities which will further improve the app.
Current Prices stay the same!
Everything gets more expensive these days and many companies increase their prices. We don’t! Prices for Epic Clone stay the same even with those new features and improvements. We want to thank you all for your interest in the app and for using it. If you like the new features, we would be happy though if you could leave a positive feedback/review on the Atlassian Marketplace or directly through your Cloud instance.
What needs to be done to get the update?
As it is a major update a Jira system administrator needs to actively update the app in your Cloud instance. To do so, go to Apps → Manage Apps and click on Update for the Epic Clone app.

Unfortunately, after this update all users using the app have to allow access again and confirm that the app is granted the necessary permissions. We know this is annoying and shouldn’t be necessary for each user. Instead, it would be better if permission can be granted by administrators for the entire instance. Atlassian plans to change this, but unfortunately, there is no schedule for this change yet.

One part of the allow access screen might lead to confusion:

Please note that we don’t send any data to external domains. This is just necessary to display the issue type icons for the issues to be cloned. It only applies to subdomains of atlassian.net and means that we want to display images from your own Cloud instance in our app.
Also after this change Epic Clone is built on Atlassian Forge, which means that no data leaves your Jira instance at any time.
Anything we can improve?
If you experience a bug in the app, if you have an idea for improvement or if you have another topic you want to talk about, feel free to visit our service management or contact us via support@ij-solutions.atlassian.net
We participated in Codegeist 2021, a hackathon hosted by devpost (https://codegeist.devpost.com ). Target was to develop an app in forge, a new development environment for the Atlassian Cloud products.
We submitted an app for Confluence Cloud, called Content toolbox for Confluence Cloud. It is our first Cloud-only app and already released on the Atlassian Marketplace. If you use Confluence Cloud, you can give it a try. We would love to hear your feedback. Just write us an email to info@ij-solutions.com
On this post I want to share the description of our Codegeist submission. It describes what the app does in detail:
Inspiration
If you have a Confluence space with documentation and you want to structure or modify a bunch of pages, it can be annoying to go from page to page to add labels or change text. Especially, if you want to add always the same label, replace the same word, or add something to the title of the pages. Of course you can write some code to do that automatically, e.g. by using an app that can execute scripts or by developing a tool which is doing this from outside Confluence via the REST API. However, you not only need to have system admin permission for most solutions, you also need to have the required skills and knowledge to write scripts and code, which is doing the tasks you want to automate in the right way. Our inspiration was to fill the gap of missing automation tool box for every user in Confluence spaces. Provide small tools which are easy to use and which help Confluence users to automate tasks to structure and modify content.
What it does
Providing a tool box to be used by every user with access to a Confluence space. The tools help to automate
Adding labels
Find&Replace text
Adding pre-/suffix to a page title
on a number of pages at once. The modifications can be made to
All pages in a space
All child pages of a page
Certain selected pages
How we built it
We used the Confluence space page module in forge and UI kit components only. With the app installed a single page is available in each Confluence space, on which the different tools are listed and can be executed by every user with access to the space to pages the user has edit permission on. The space page is structured in tabs, with one tool on each tab. Those tools are
Add label(s)
Find & Replace text in either title, body, or body + title
Add prefix or suffix to page title
For each tool it can be selected whether the change should be made on all pages in that space, all child pages of a page, or only to certain selected pages. The app contains of 4 modules, which are stored in single files:
Index: Contains main app function executed when the page is loaded (3 tool-tabs with forms for each tool)
Core: Functions which are called when the different tools are executed (from index). Contains the all functions which are calling the rest apis for the actual modification of content
Components: Definition of single forge UI kit components like select list or check boxes (e.g. page select list containing all pages in the space). Those components are called from the index file to be displayed on the space page.
Fetchdata: Contains rest apis to get data from Confluence, e.g. get a single page, get all pages in the space The app architecture is also displayed in the image gallery under project media.
Challenges we ran into
The following three challenges were the most difficult ones we faced during development.
We needed to find the right logic for page selection and fetching of page data to be modified by our app. Should the user only be able to select certain pages one-by-one? Should there be a simple way of selection provided, e.g. with “all child pages”, “all pages of space”? How can this be achieved and what conditions are necessary to display/hide the page selections? We finally solved this by using radio buttons to select whether you want to do the modification on all pages of the space, certain selected pages, or all child pages of a selected page. If you don’t select to do this on all pages of the space, another select list appears where the user can choose the pages to be modified.
If we modify the body of a page, what is the right storage format we need to fetch and how can that be modified? It was difficult to find a way to only modify the text and not e.g. macro parameters where the search string is also included. We finally solved that by writing a regex search which is looking for all strings between “<p>” and “</p>” html tags in a storage representation of the pages body. Then, we check if this text contains the search string and replace this string in the body. By this procedure we could assure that only the text is changed and not any macro parameters or something else which shouldn’t be modified.
We do the actual page modification in a different file than the one where we defined how the space page looks like with form, components, etc. It was a challenge to get the final result of the operation displayed correctly on the space page after the user pressed the submit button of the respective form. For adding labels, for instance, we first tried to add the labels in the respective function, then request the new labels on the page, and then return this back to the main app page to be displayed to the user. However, this didn’t work correctly, as the adding of the labels wasn’t completed until the result was returned. So, we always got the page labels before adding of the new labels. Finally, we decided to not request the new labels, but to just display that the operation was successful and to which pages the new label(s) have been added.
Accomplishments that we're proud of
We are proud of having built an app with UI kit in forge that helps all Confluence users to save time for content structuring and modification. To do such tasks manually is time consuming and can be annoying. We found a solution to automate that and thus save users time for concentrating on the actual content they produce in Confluence. By using concurrent requests we were able to achieve editing of multiple pages in a space at once without having to wait minutes until it is completed. As we built the app modular, it can easily be extended in the future. Already during development and especially in the final steps, several additional ideas came up to provide even more “tools” and functionality. The 3 tabs we have currently can easily be extended and also providing such a tool page in the space admin area could be a possibility to also have space admin tools, which might do more complex operations.
What we learned
Forge UI kit is great to built apps for Atlassian cloud products and it can help quickly to solve problems without being too complex. Other than custom UI, our experience was that an app with UI kit can easily and quickly be created, developed, and distributed to users. However, there are also some limitations at some points. Sometimes flexibility is missing regarding what can be set in the UI to display content to the user. As an example, we couldn’t achieve to display text in a different color (e.g. in red for error messages) or we couldn’t achieve to set vertical or horizontal alignment in table cells. At some points, those drawbacks limit the ability to display the content and app menus in the best way for users to be easily understood. The same applies for certain rest APIs or availability of the forge modules and ui kit components. For our app, we got everything we needed and it worked as expected. However, if you need something special for your app to work, which is not available in forge, you are limited regarding functionality. That was also something we learned, that forge is great and you can do a lot with it to built nice apps. On the other hand, it is still not complete and requires further development in some regards.
What's next for Confluence Content Toolbox
As mentioned above, during development additional ideas for small “tools” came up. So, the current functionality of the app, could be extended in the future. This also includes the possibility to not only have a toolbox page for all space users, but also one which is only available to space admins or even to Confluence administrators. Those pages could include the possibility to perform more advanced operations which require extended admin permission. We also want to bring the app to the Marketplace, so it can be tested and used by other Confluence users who are interested to save time when modifications to a bunch of Confluence pages becomes necessary.
Of course, this is very technical stuff. To show you the final result, here are some screenshot which illustrate the apps functionality.


More information can also be found in the documentation for this app: https://ij-solutions.atlassian.net/wiki/spaces/CCT/overview
Todays post will be about our new app - User Absence Planner for Jira. It is on the Atlassian Marketplace for some weeks now and I would like to explain here what it does and what it can be used for.
Problem
Before being out of office for a while, on vacation, business trip or long term leave for example, everyone sets an out of office message in their mail client. When writing you an email people get an automated response that you are out of office in that period. This is a quite usual procedure in many companies. However, what about your Jira account? What about important issues you get assigned during your holidays? Do other users get notified in Jira as well that you aren’t available?
Probably not, as this is not a default functionality in Jira. Especially for larger companies where not all Jira users work at the same location, this might become a problem. Important topics might be left untouched if the person supposed to work on it is not in the office for some time. For sure, if you work in a small team and probably sit together in the same office, you know immediately who is available and who isn’t in.
But what about larger companies where you assign issues to someone you might not even know in person? Or someone located in an office somewhere far away, maybe even in a different time zone? It is not viable to send a parallel email to see if you get an out-of-office reply and thus to get to know if the person is in or not.
Solution

With our new app User Absence Planner for Jira you can bring those out of office notifications to Jira. More precisely, it helps to display and indicate for every Jira user, if the colleague is in or not, and even indicates if a user is currently online and logged in to Jira.
Every Jira user gets a new option on the user profile called absence planner. Absences of different type like holidays, business trip, or training participations can be added in advance. Individual absence messages for other team members can be inserted as well.


In Jira issues, an icon is displayed next to every user in
Assignee field
Reporter field
User custom fields
User mentions
This icon indicates if the user is online and available (green), not available (blue, absence currently set) or offline (grey). When hovering over that icon, the absence message is displayed. Also, if displaying the small user profile on mouse over, the absence details are displayed including absence type, period and message (if set).


Finally, the app provides powerful JQL functions to quickly search for issues with users in assignee or any other user field who are not in. This can be done either for today or for any other specific date. With these functions you can keep important issues on the radar which are assigned to users who aren't available.

User Absence Planner for Jira brings the ability to plan user absence times and communicate them efficiently to other team members. It helps to get things done on time without risk of assigning important issues to users who aren’t available.
The app is quite new and of course there are features we plan to add to the app in the future. The first users already brought in their feature requests and we try to implement as much as possible to satisfy all these needs.
If you want to give it a try, you can find a Server and Data Center version on the Atlassian Marketplace.
We would love to hear your feedback about it. Just write us an email to info@ij-soltuions.com or reach out via our Service Management.
May 1st 2021 - isn’t it a great date to restart the ij-solutions blog?
I think so, and also to move the blog again back to Confluence. Now in the cloud. We started 2 years ago on Confluence server, then switched to our homepage. Now we are back on Confluence in the cloud. Blog templates are already there and we have our whole app documentation and knowledge base here, so why using a different environment to write the blog which wasn’t actually designed for it?
For sure, the blog posts from last year will remain in the blog section of our homepage. We might link them sometimes in the upcoming posts, so they are not gone and can be read through again. If you are new to this blog, you can find the older posts here.
If you are looking for this text in German, we unfortunately have to tell you that it will be only available in English from now on. Writing in two languages increases the effort and furthermore, many terms in the Atlassian environment haven’t got an equal German word and thus aren’t translated that well in my point of view.
Now to the topic of this restart blog post: I participated in team 21, the digital conference hosted by Atlassian formerly known as summit. I want to share my thoughts on it. This also fits to my last post in October 2020 after the announcement of Atlassian to end support for their server products. Now, the first conference took place after that announcement and the profound changes in the Atlassian tool landscape.
The most important impressions for me have been the following 3:
Atlassian announced to be a “cloud first” company in October last year. In the team 21 event it felt like they are a “cloud only” company. The on premise tools (only data center left over) are only mentioned in subordinate clauses. 95% of sessions contents have been about the cloud products. For us it is important to keep track with that development and therefore we already started to develop our first cloud app some time ago. We hope our cloud version of epic clone will be published soon on the Marketplace and we are also working on other apps for Confluence cloud together with a partner from Canada. We will share some information about it soon.
Again, new companies have been acquired by Atlassian in the past year and thus new tools joined the Atlassian family. Additionally, own developed tools are launched. Today, a jungle of tools and integrations exist and for me it seems like it becomes more and more difficult to know all of them and to get to know which one is the best solution for someones purposes. I am wondering if that is intended by Atlassian or if there will be a consolidation take place at some time to clean up this jungle? Let’s see how this will go on…
For me, the most interesting tool that has been launched is Jira Work Management. It actually is Jira Core which existed already before and which was intended for business teams. It know has been further developed to come with new project templates for various teams (e.g. HR, legal, finance, etc.). This is something I am working on for years in the on premise environment now. Customizing a tool like Jira, which initially has been used to support software development, so it can be used for other teams and departments as well and fulfills their individual requirements. On Server, this requires a lot of effort, different apps and own developed solutions. Jira Work Management now seems to provide this in the cloud out of the box. I directly subscribed to the new product in our cloud instance and will test it over the next couple of weeks. I will share my experiences with it in this blog. For me it looks very interesting and if it is working as promoted by Atlassian, it could be a huge benefit for those who want to use Jira also for business teams in their organization.
Beside that, Atlassian team 21 provided numerous other news and sessions from various areas. To name them all would be too much for this post.
But what do you think about it? Do you have another opinion on some of the points? Feel free to contact me on linkedIn, write me an email to jonas@ij-solutions.com or comment directly on this page.
Cheers,
Jonas